Service Providers
This page contains information about connecting services to EGI Check-in in order to allow user login through Check-in and to receive users’ attributes. Check-in is connected to a wide range of academic and social Identity Providers that users can choose from in order to access your service.
Services eligible for integration
EGI Operations, as owner of the Check-in service, must approve every request for integration of new services with Check-in. The approval (or non-approval) is based on some prerequisites, the relevance of the service for the EGI community and the available resources to support the integration. The prerequisites are described in the following sections.
EGI at any time can prevent a service provider to access the Check-in service
Services federated in EGI
All the services that are operated by Resource Providers federated in EGI federation and that abide to the RC OLA, and consequently to the relevant security policies of EGI, can be connected with Check-in. Fulfilling all the relevant EGI policies makes the service eligible in receiving attributes released by Check-in.
Services not federated in EGI
A service not part of the EGI federation can be integrated with Check-in if the organisation providing the service complies with the EGI security requirements relevant to the service providers.
By accepting the policies a service provider assures that they will operate the service in good faith, without deliberately exposing the user to security risks, without claiming intellectual property on the data owned by the user, and protecting sensitive data generated by the interaction of the user with the service.
The policies that the service provider will have to accept are available in the EGI Policies and procedures page and specifically are:
- EGI Security Policy
- Service Operations Security Policy
- Traceability and Logging Policy
- Security Incident Response Policy
- Policy on the Processing of Personal Data
Service Provider integration workflow
To integrate your Service Provider with the EGI Check-in service, you need to create a registration request using the EGI Federation Registry Portal. You can also use the Federation Registry portal to request the reconfiguration or deregistration of an existing deployed service. Service registration requests typically require approval by an administrator. Please refer to the Federation Registry Documentation for more information.
The integration follows a two-step process:
- Register your Service Provider and test integration with the demo
instance of EGI Check-in by selecting the “Demo” integration environment
during registration through the EGI Federation Registry Portal. Service
registration requests require approval by an administrator. The review
process for the demo environment involves primarily the technical aspects of
the service configuration. However, moving the service to production requires
compliance with all the
eligibility criteria (see Step 2). The
demo instance allows for testing authentication and authorisation through the
academic and social Identity Providers connected to Check-in without
affecting the production Check-in service. Note that while the demo instance
has identical functionality to the production instance, no information is
shared between the two systems.
- You can also test new features of Check-in that are not available in production yet, by registering your Service Provider and testing integration with the development instance of Check-in. In the development instance service requests can be self-reviewed without the need to wait for approval from an administrator. As with the demo instance, the development instance allows for testing authentication and authorisation without affecting the production Check-in service. NB: The development environment is intended for testing the latest features of Check-in and may differ from the demo and production environments in terms of stability and functionality. Keep in mind that the supported Identity Providers in the development instance are limited. Therefore, we recommend using any of the social identity providers or the EGI SSO to test the login workflow when using the development instance.
- Register your Service Provider with the production instance of EGI Check-in by selecting the “Production” integration environment during registration through the EGI Federation Registry Portal. The production instance allows access to your service through the academic and social Identity Providers connected to Check-in. This requires that your service meets all the eligibility criteria and that integration has been thoroughly tested during Step 1.
General Information
EGI Check-in supports two authentication and authorisation protocols that you can choose from:
- Security Assertion Markup Language (SAML) 2.0
- OpenID Connect - an extension to OAuth 2.0
Service providers should ensure that a proper authorisation model is put in place: if low assurance accounts, like those coming from social media identity providers, are granted access without any vetting, it may lead to an abuse of their service.
Regardless of which of the two protocols you are going to use, you need to provide the following information to connect your service to EGI Check-in:
- Name of the service (in English and optionally in other languages supported by the service)
- Short description of the service
- Site (URL) for localised information about the service; the content found at the URL SHOULD provide more complete information than what provided by the description
- Contact information of the following types:
- Helpdesk/Support contact information (for redirecting user)
- Administrative
- Technical
- Security/incident response
- Privacy statement URL: The privacy policy is used to document the data collected and processed by the service. You can use the Privacy Policy template
- Logo URL (optional for showing in catalogues); if provided, logos SHOULD:
- use a transparent background where appropriate to facilitate the usage of logos within a user interface
- use PNG, or GIF (less preferred), images
- use HTTPS URLs in order to avoid mixed-content warnings within browsers
- have a size larger than 40000 and smaller than 50000 characters when encoded in base64
- Country of the service
- Compliance with the EGI Policies and the REFEDS Data Protection Code of Conduct
The most important URLs for each environment are listed in the table below but more information can be found in the protocol-specific sections that follow.
| Protocol | Production environment |
|---|---|
| SAML | https://aai.egi.eu/auth/realms/egi/protocol/saml/descriptor |
| OpenID Connect | https://aai.egi.eu/auth/realms/egi/.well-known/openid-configuration |
| Protocol | Demo environment |
|---|---|
| SAML | https://aai-demo.egi.eu/auth/realms/egi/protocol/saml/descriptor |
| OpenID Connect | https://aai-demo.egi.eu/auth/realms/egi/.well-known/openid-configuration |
| Protocol | Development environment |
|---|---|
| SAML | https://aai-dev.egi.eu/auth/realms/egi/protocol/saml/descriptor |
| OpenID Connect | https://aai-dev.egi.eu/auth/realms/egi/.well-known/openid-configuration |
SAML Service Provider
To enable federated access to a web-based application, you can connect to the EGI Check-in IdP as a SAML Service Provider (SP). Users of the application will be redirected to Check-in in order to log in, and Check-in can authenticate them using any of the supported backend authentication mechanisms, such as institutional IdPs registered with eduGAIN or Social Providers. Once the user is authenticated, EGI Check-in will return a SAML assertion to the application containing information about the authenticated user.
Metadata registration
SAML authentication relies on the use of metadata. Both parties (you as a SP and
the EGI Check-in IdP) need to exchange metadata in order to know and trust each
other. The metadata include information such as the location of the service
endpoints that need to be invoked, as well as the certificates that will be used
to sign SAML messages. The format of the exchanged metadata should be based on
the XML-based
SAML 2.0 specification.
Usually, you will not need to manually create such an XML document, as this is
automatically generated by all major SAML 2.0 SP software solutions (e.g.,
Keycloak, Shibboleth, SimpleSAMLphp, and mod_auth_mellon). It is important
that you serve your metadata over HTTPS using a browser-friendly SSL
certificate, i.e. issued by a trusted certificate authority.
You can get the metadata of the EGI Check-in IdP Proxy on a dedicated URL that depends on the integration environment being used:
| Instance | Production environment |
|---|---|
| Keycloak-based EGI Check-in IdP |
|
| Legacy EGI Check-in IdP |
|
| Instance | Demo environment |
|---|---|
| Keycloak-based EGI Check-in IdP |
|
| Legacy EGI Check-in IdP |
|
| Instance | Development environment |
|---|---|
| Keycloak-based EGI Check-in IdP |
|
| Legacy EGI Check-in IdP |
|
To register your SAML SP, you must submit a service registration request through the Federation Registry. Your request should include essential information about your service, as outlined in the General Information section, along with your SP’s metadata URL and entity ID.
Metadata
Metadata provided by your SP should contain a descriptive name of the service
that your SP represents in at least English. It is recommended to also provide
the name in other languages which are commonly used in the geographic scope of
the deployment. The name should be placed in the <md:ServiceName> in the
<md:AttributeConsumingService> container.
It is recommended that your SP metadata contains:
- an
<md:SPSSODescriptor>role element containing- an
AuthnRequestsSignedand anWantAssertionsSignedattribute set totrue - at least one
<md:AssertionConsumerService>endpoint element - at least one
<md:KeyDescriptor>element whose use attribute is omitted or set to encryption - an
<md:Extensions>element at the role level containing- an
<mdui:UIInfo>extension element containing the child elements<mdui:DisplayName>,<mdui:Logo>, and<mdui:PrivacyStatementURL> - an
<mdattr:EntityAttributes>extension element for signaling Subject Identifier requirements with previously prescribed content
- an
- an
<md:ContactPerson>element with a contactType ofsupportand/or a<md:ContactPerson>element with a contactType oftechnical. The<md:ContactPerson>element(s) should contain at least one<md:EmailAddress>. The support address may be used for generic support questions about the service, while the technical contact may be contacted regarding technical interoperability problems. The technical contact must be responsible for the technical operation of the service represented by your SP.
- an
If the SP supports the Single Logout profile, then its metadata MUST contain
(within its <md:SPSSODescriptor> role element):
- at least one
<md:KeyDescriptor>element whose use attribute is omitted or set to signing - at least one
<md:SingleLogoutService>endpoint element (this MAY be omitted if the SP solely issues<samlp:LogoutRequest>messages containing the<aslo:Asynchronous>extension SAML2ASLO)
Attributes
The EGI Check-in IdP is guaranteed to release a minimal subset of the REFEDS R&S attribute bundle to connected Service Providers without administrative involvement, subject to user consent. The following attributes constitute a minimal subset of the R&S attribute bundle:
- Community User Identifier (CUID) which is a globally unique, opaque,
persistent and non-reassignable identifier identifying the user
(
voPersonID). For users whose community identity is managed by Check-in, this identifier is of the form<uniqueID>@egi.eu. The<uniqueID>portion is an opaque identifier issued by Check-in. - Email address (
mail) - Display name (
displayName) OR (givenNameANDsn)
A more extensive list of all the attributes that may be made available to Service Providers is included in the User Attribute section.
Attribute-based authorisation
As mentioned in the General Information, omitting authorisation checks may lead to abuse of the service.
EGI Check-in provides information about the authenticated user that may be used by Service Providers in order to control user access to resources. This information is provided by the EGI Check-in IdP in the SAML attribute assertion. The table below lists the SAML attributes that are relevant for user authorisation:
| Description | SAML Attribute |
|---|---|
| VO/group membership/roles of the authenticated user | eduPersonEntitlement |
| Capabilities | eduPersonEntitlement |
| GOCDB roles | eduPersonEntitlement |
| Identity Assurance | eduPersonAssurance |
Service Provider Migration to Keycloak
The migration guide below applies to SAML Service Providers (SPs) registered in the Development, Demo and Production environments of Check-in.
Development and Demo: Beginning March 9, 2023, SAML SPs using the legacy Check-in IdP metadata will no longer be supported.
Production: Beginning December 12, 2023, SAML SPs using the legacy Check-in IdP metadata will no longer be supported.
How to Migrate your Service to Keycloak
If your SAML SP is not yet registered in the Federation Registry, you will need to submit a service registration request. This request should include essential information about your service, as described in the General Information section, in addition to your SAML SP’s metadata URL and entity ID.
If your SAML SP is already registered, please ensure the accuracy of the information under the General tab, particularly the policy and contact details, as well as the Protocol Specific tab. Pay special attention to the new Requested Attributes section, which allows you to manage the user attributes available through Check-in.
Important
If your SAML SP relies on experimental features of Check-in which are only available in the Development environment, you will need to re-register your SP through the Federation Registry using the “Copy Service” functionality.New Identity Provider Metadata
The first thing you need to do is to update the IdP metadata URL in the SP configuration, according to the Metadata registration section.
New Attributes
When migrating your SP to the Keycloak-based EGI Check-in IdP, please be aware that some attributes will no longer be supported. These deprecated attributes will be replaced by new ones, as detailed in the table below:
| Deprecated Attributes | New Attributes |
|---|---|
distinguishedName | voPersonCertificateDN |
eduPersonScopedAffiliation | voPersonExternalAffiliation |
eduPersonUniqueId | voPersonID |
Note
The values of the deprecated attributes will remain unchanged; only the attribute names will be different.Ensure that you update the attribute mapping in your SP configuration to align with the new attribute names.
NameID
Use of <saml:NameID> elements is intended for the Single Logout profile and
is not suitable for long-term identification of users.
For user identification, you should use the voPersonID SAML attribute, as
detailed in the User attributes section.
Your SAML SP should explicitly specify in its metadata the NameID formats it
supports from the following options:
- Persistent (
urn:oasis:names:tc:SAML:2.0:nameid-format:persistent) - Transient (
urn:oasis:names:tc:SAML:2.0:nameid-format:transient) - Email address (
urn:oasis:names:tc:SAML:1.1:nameid-format:emailAddress) - Unspecified (
urn:oasis:names:tc:SAML:1.1:nameid-format:unspecified)
Otherwise, Keycloak will assign the unspecified
(urn:oasis:names:tc:SAML:1.1:nameid-format:unspecified) NameID format to
your SP.
References
- Keycloak Service Provider Documentation
- Shibboleth Service Provider Documentation
- SimpleSAMLphp Service Provider QuickStart
- Simple SAML 2.0 service provider with mod_auth_mellon Apache module
Example SAML Service Provider Configurations
Keycloak
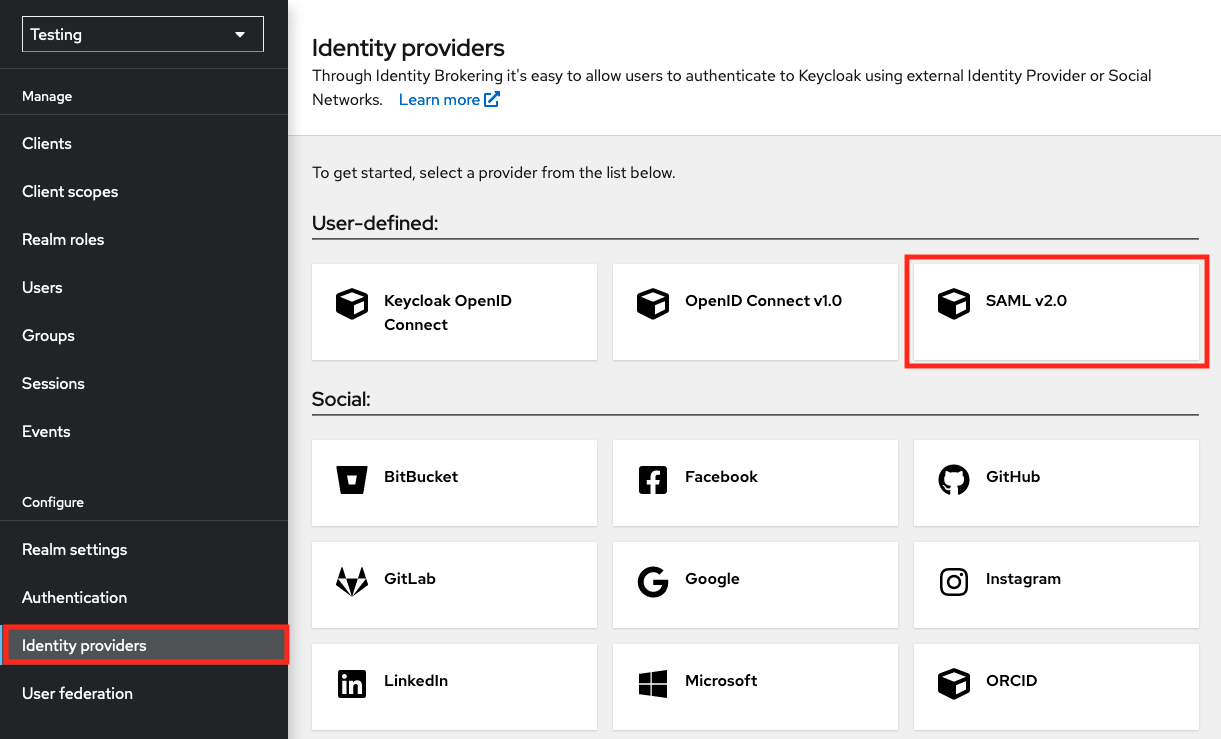
If you are using Keycloak as an SAML Service Provider, then you need to follow the steps below in order to register EGI Check-in as an Identity Provider:
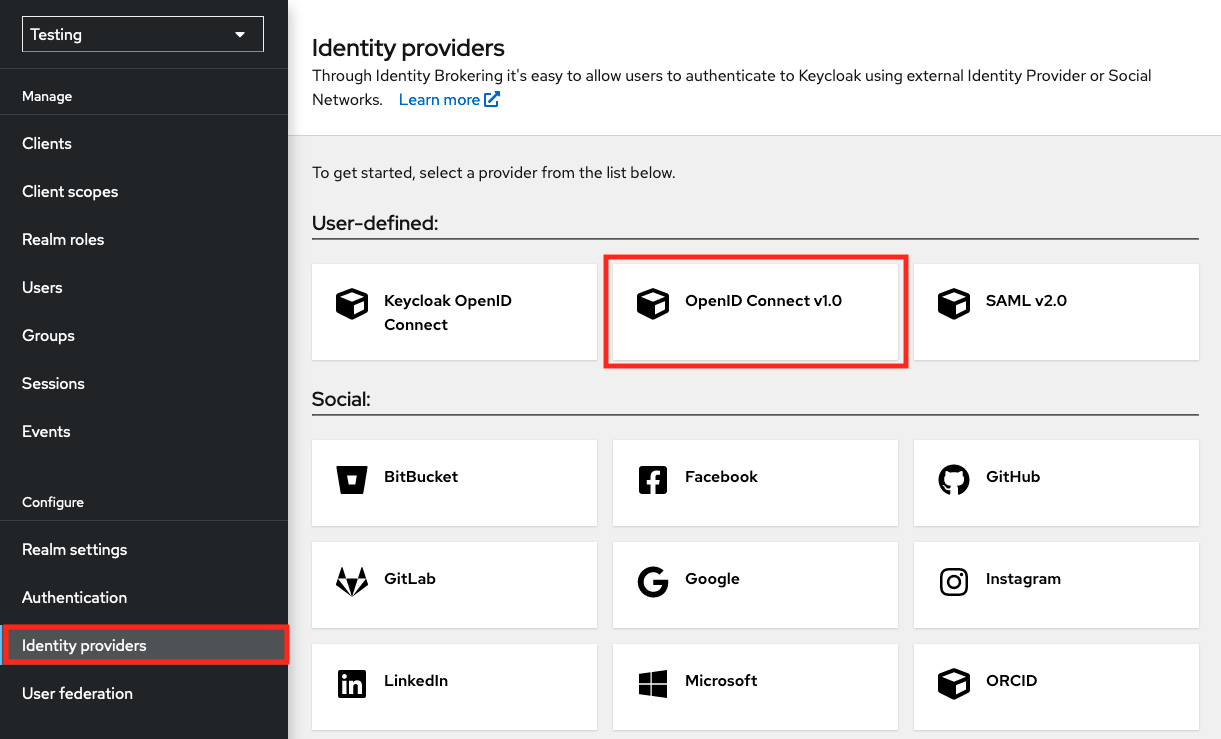
Access the administrator console of your Keycloak instance and navigate to “Identity Providers” and then select “SAML v2.0”
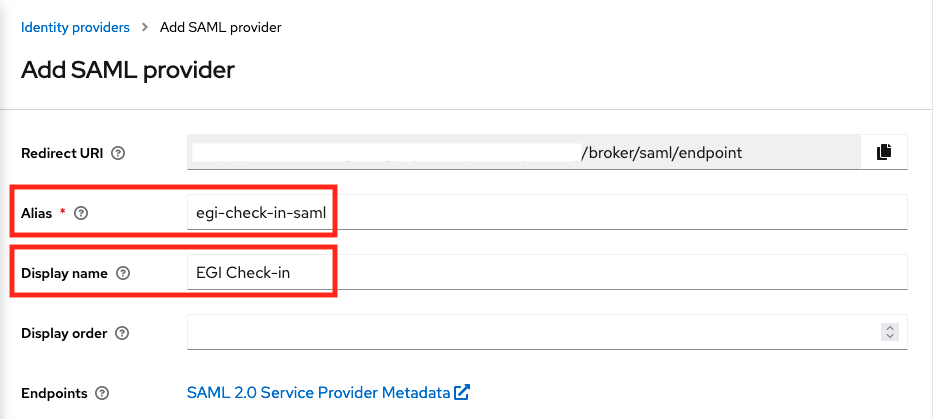
In the next page, complete the following fields:
- Alias:
egi-check-in-saml - Display name:
EGI Check-in
Scroll down, and complete the rest options:
- SAML entity descriptor:
https://aai.egi.eu/auth/realms/egi/protocol/saml/descriptor
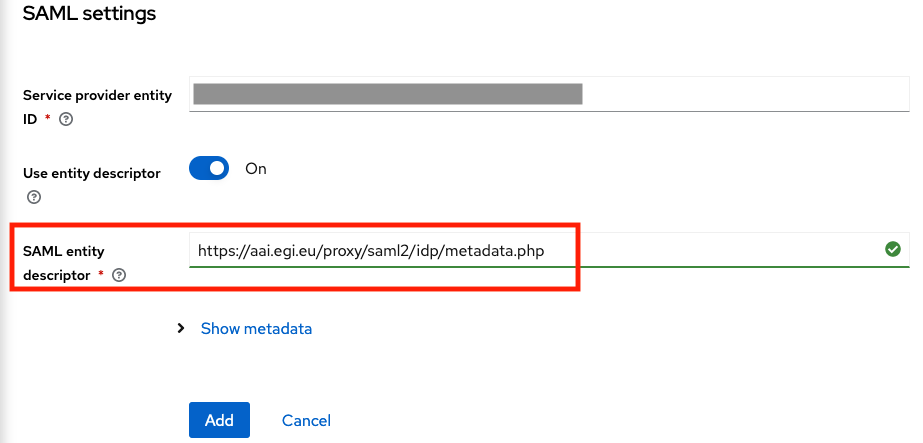
And then click on the “Add” button.
- Alias:
After adding EGI Check-in IdP, scroll down to the “SAML settings” section and edit the following options:
- Principal type:
Attribute [Name] - Principal attribute:
urn:oid:1.3.6.1.4.1.25178.4.1.6 - HTTP-POST binding response:
On - HTTP-POST binding for AuthnRequest:
Off - HTTP-POST binding logout:
Off - Want AuthnRequests signed:
Off - Want Assertions signed:
Off - Want Assertions encrypted:
On - Validate Signatures:
On
Note
urn:oid:1.3.6.1.4.1.25178.4.1.6is the OID presentation of thevoPersonIDattribute.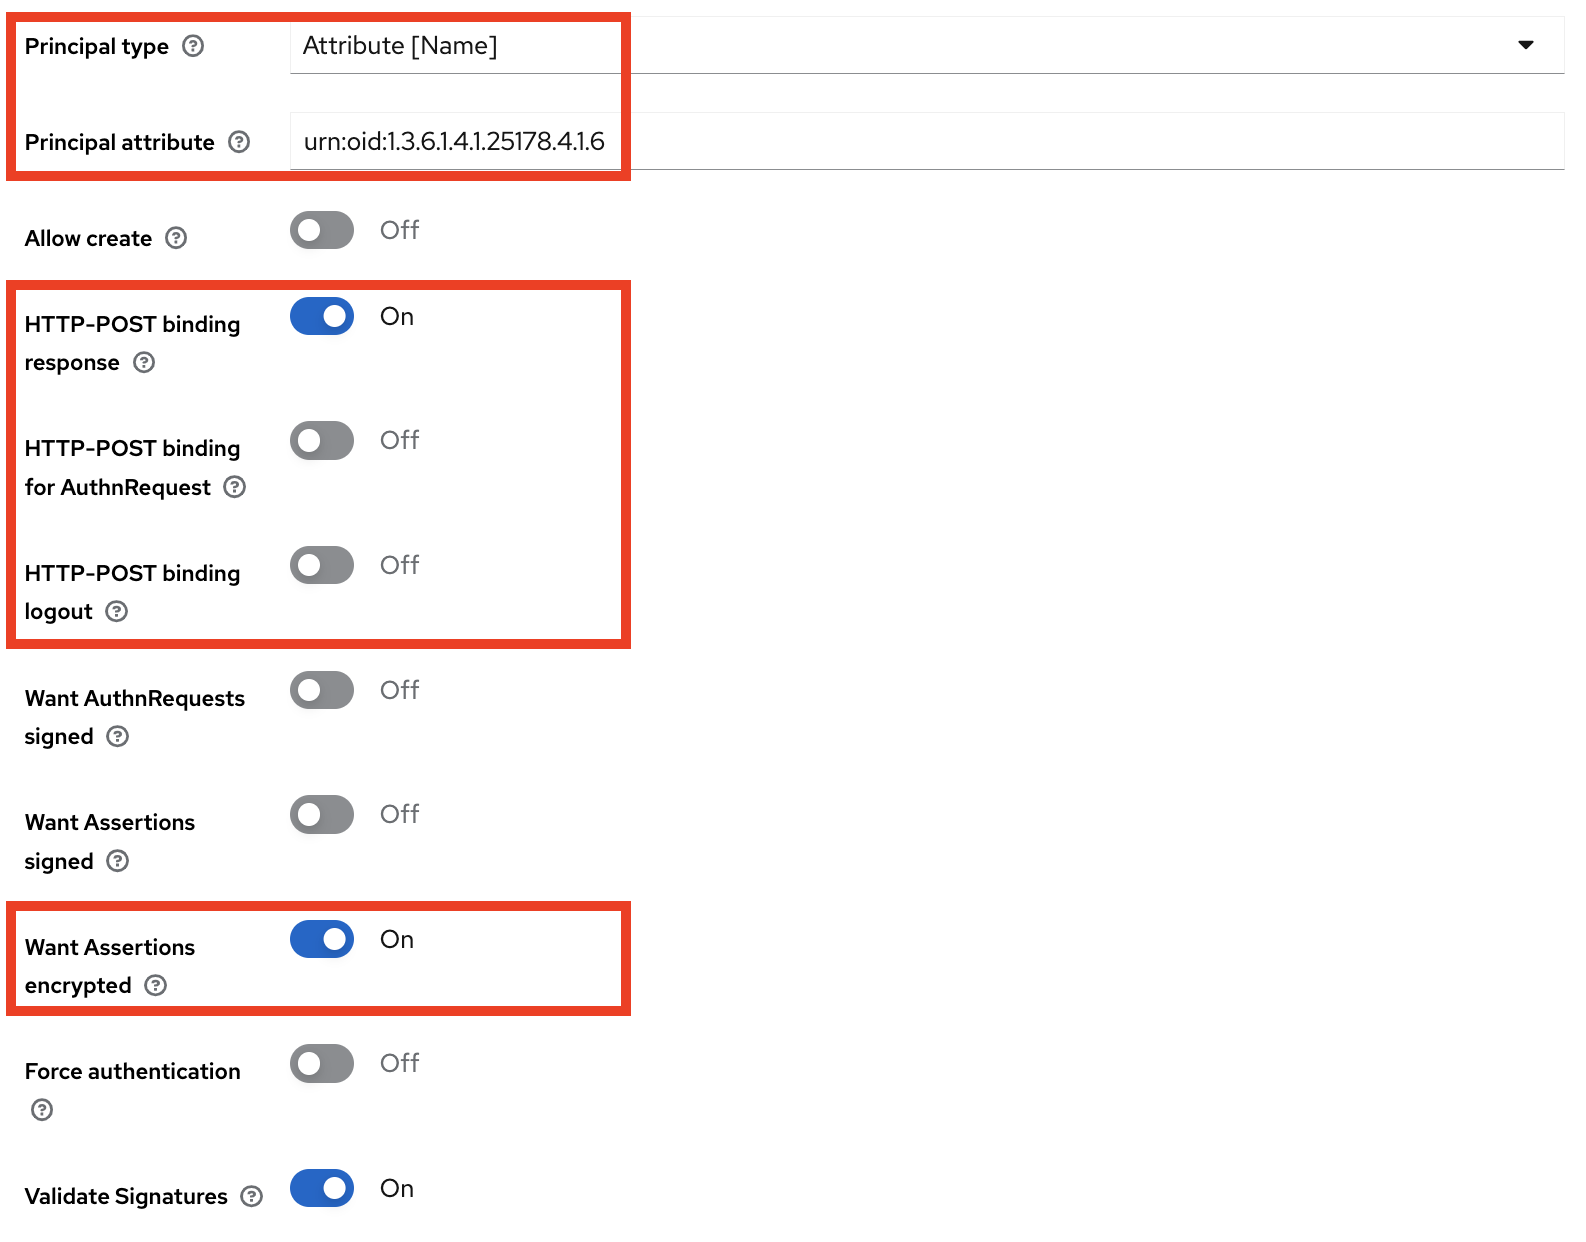
- Principal type:
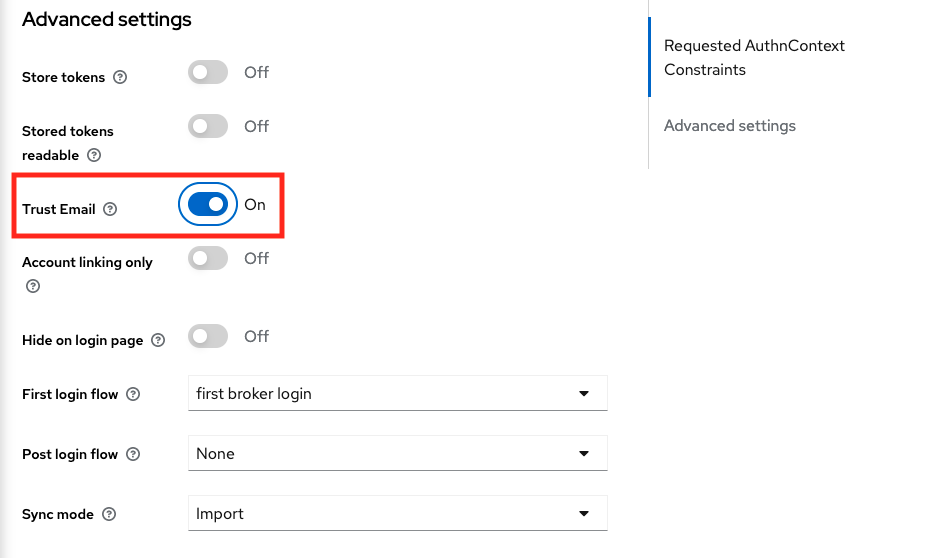
Then, scroll down to the “Advanced settings” section and enable the “Trust Email” option and click on “Save”.
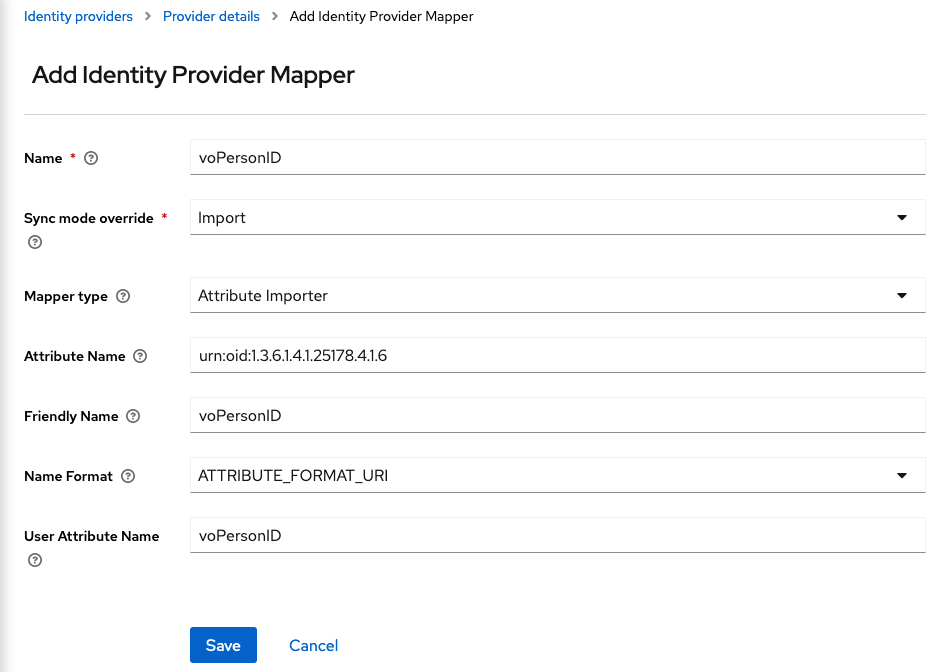
Next, you will need to create a mapper for each attribute that your Service Provider will request from EGI Check-in Proxy. Go to the “Mappers” tab and then click on “Add Mapper”.
For the
voPersonIDattribute you will need to add the following options:- Name:
voPersonID - Sync Mode Override:
import - Mapper Type:
Attribute Importer - Attribute Name:
urn:oid:1.3.6.1.4.1.25178.4.1.6 - Friendly Name:
voPersonID - Name Format:
ATTRIBUTE_FORMAT_URI - User Attribute Name:
voPersonID
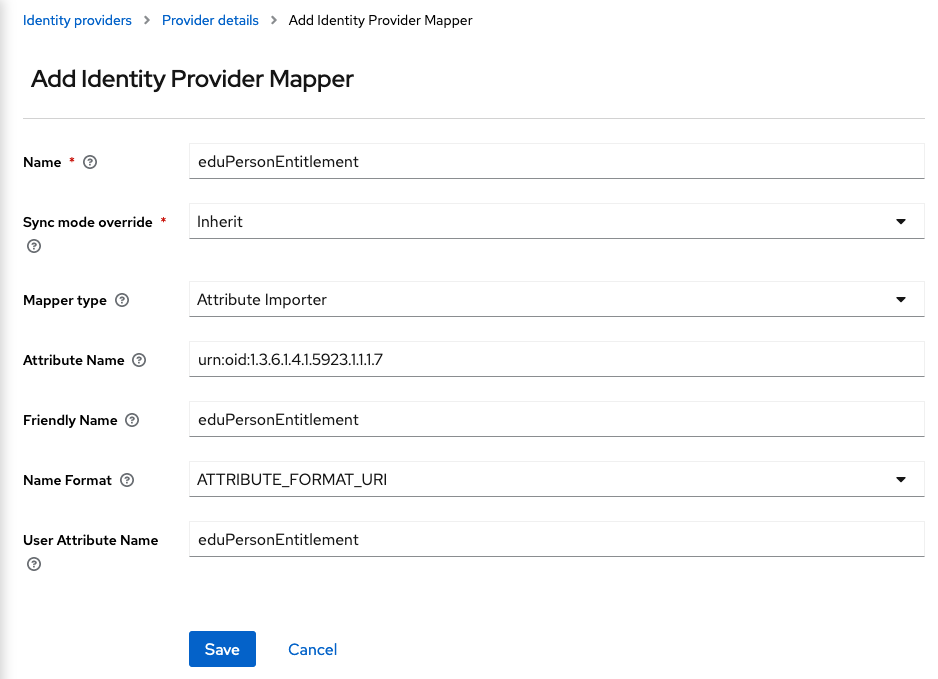
And for the
eduperson_entitlementclaim:- Name:
eduPersonEntitlement - Sync Mode Override:
Inherit - Mapper Type:
Attribute Importer - Attribute Name:
urn:oid:1.3.6.1.4.1.5923.1.1.1.7 - Friendly Name:
eduPersonEntitlement - Name Format:
ATTRIBUTE_FORMAT_URI - User Attribute Name:
eduPersonEntitlement
- Name:
OpenID Connect Service Provider
Service Providers can be integrated with EGI Check-in using OpenID Connect (OIDC) as an alternative to the SAML2 protocol. To allow this, the EGI Check-in IdP provides an OpenID Connect (OAuth2) API based on Keycloak, which has been certified by the OpenID Foundation. Interconnection with the EGI Check-in OpenID Provider allows users to sign in using any of the supported backend authentication mechanisms, such as institutional IdPs registered with eduGAIN or Social Providers. Once the user has signed in, EGI Check-in can return OIDC Claims containing information about the authenticated user.
Client registration
Before your service can use the EGI Check-in OpenID Provider for user login, you must submit a service registration request using Federation Registry in order to obtain OAuth 2.0 credentials. The client configuration should include the general information about your service, as described in General Information section.
Obtaining OAuth 2.0 credentials
You need OAuth 2.0 credentials, which typically include a client ID and client secret, to authenticate users through the EGI Check-in OpenID Provider.
You can specify the client ID and secret when creating/editing your client or let them being automatically generated during registration (recommended).
To find the ID and secret of your client, do the following:
- Select your client from the Manage Services Page.
- Look for the Client ID in the Protocol tab.
- Select the Display/edit client secret: option from the Protocol tab.
Note
You can copy these values using the green copy button next to the desired field.Redirection URIs
OpenID Connect Services MUST pre-register one or more Redirection URI(s) to
which authentication responses from EGI Check-in will be sent. EGI Check-in
utilises exact matching of the redirect URI specified in an authentication
request against the pre-registered URIs
OAuth2-BCP,
with the matching performed as described in
RFC3986 (Simple String
Comparison). Redirection URIs MUST use the schemata defined in Section
3.1.2.1 of the
OIDC-Core
specification. Note that the Redirection URI MUST use the https scheme;
the use of http Redirection URIs is only allowed in the development
environment.
Claims
The EGI Check-in UserInfo Endpoint is an OAuth 2.0 Protected Resource that returns specific information about the authenticated end user as Claim Values. To obtain the requested Claims about the end user, the Client makes a request to the UserInfo Endpoint using an Access Token obtained through OpenID Connect Authentication. The scopes associated with the Access Token used to access the EGI Check-in UserInfo Endpoint will determine what Claims will be released. These Claims are represented by a JSON object that contains a collection of name and value pairs for the Claims.
The following scope values can be used to request Claims from the EGI Check-in UserInfo Endpoint:
| Scope | Claims |
|---|---|
openid | sub |
voperson_id | voperson_id |
profile |
|
email |
|
aarc |
|
eduperson_entitlement | eduperson_entitlement |
voperson_certificate |
|
voperson_external_affiliation | voperson_external_affiliation |
A more extensive list of all the attributes that may be made available to Service Providers is included in the User Attribute section.
Grant Types
Check-in supports the following OpenID Connect/OAuth2 grant types:
- Authorization Code: used by Web Apps executing on a server.
- Token Exchange: used by clients to request and obtain security tokens in support of delegated access to resources.
- Device Code: used by devices that lack a browser to perform a user-agent based OAuth flow.
- Client credentials: used by clients to obtain an access token outside of the context of a user. Such an access token is typically used by clients to access resources about themselves rather than to access a user’s resources.
Authorization Code
The Authorization Code Flow returns an Authorization Code to the Client, which can then exchange it for an ID Token and an Access Token directly. This provides the benefit of not exposing any tokens to the User Agent and possibly other malicious applications with access to the User Agent. The Authorization Server can also authenticate the Client before exchanging the Authorization Code for an Access Token. The Authorization Code flow is suitable for Clients that can securely maintain a Client Secret between themselves and the Authorization Server.
Authorization Code Flow Steps
The Authorization Code Flow goes through the following steps.
- Client prepares an Authentication Request containing the desired request parameters.
- Client sends the request to the Authorization Server.
- Authorization Server Authenticates the end user.
- Authorization Server obtains end user Consent/Authorization.
- Authorization Server sends the end user back to the Client with an Authorization Code.
- Client requests a response using the Authorization Code at the Token Endpoint.
- Client receives a response that contains an ID Token and Access Token in the response body.
- Client validates the ID token and retrieves the end user’s Subject Identifier.
Authentication Request
The request parameters of the Authorization Endpoint are:
client_id: ID of the client that ask for authentication to the Authorization Server.redirect_uri: URI to which the response will be sent.scope: A list of attributes that the application requires.state: Opaque value used to maintain state between the request and the callback.response_type: value that determines the authorization processing flow to be used. For Authorization Code grant setresponse_type=code. This way the response will include an Authorization Code.
Example request:
  HTTP/1.1 302 Found
  Location: ${AUTHORIZATION_ENDPOINT}?
    response_type=code
    &scope=openid%20profile%20email
    &client_id=s6BhdRkqt3
    &state=af0ifabcd
    &redirect_uri=https%3A%2F%2Fclient.example.org%2Fcb
Example response:
  HTTP/1.1 302 Found
  Location: https://client.example.org/cb?
    code=SplxlOBeZQQYbYS6WxSbIA
    &state=af0ifabcd
Token Request
A Client makes a Token Request by presenting its Authorization Grant (in the
form of an Authorization Code) to the Token Endpoint using the grant_type
value authorization_code, as described in Section 4.1.3 of OAuth 2.0
RFC6749. If the Client
is a Confidential Client, then it MUST authenticate to the Token Endpoint
using the authentication method registered for its client_id. The Client sends
the parameters to the Token Endpoint using the HTTP POST method and the Form
Serialization.
The parameters that are present in the token request are described in the table below:
| Parameter | Presence | Values |
|---|---|---|
grant_type | Required | authorization_code |
code | Required | The value of the code in the response from Authorization Endpoint |
redirect_uri | Required | URI to which the response will be sent (must be the same as the request to Authorization Endpoint) |
Example request:
$ curl -X POST "${TOKEN_ENDPOINT}" \
    -H 'Content-Type: application/x-www-form-urlencoded' \
    -u "${CLIENT_ID}":"${CLIENT_SECRET}" \
    -d "grant_type=authorization_code" \
    -d "code=SplxlOBeZQQYbYS6WxSbIA" \
    -d "redirect_uri=https%3A%2F%2Fclient.example.org%2Fcb" | python -m json.tool
Example response:
{
  "access_token": "SlAV32hkKG...",
  "expires_in": 3600,
  "id_token": "eyabcdGciOiJSUzI1N...",
  "token_type": "Bearer"
}
Proof Key for Code Exchange (PKCE)
The Proof Key for Code Exchange (PKCE, pronounced pixie) extension
(RFC 7636) describes a technique for
public clients (clients without client_secret) to mitigate the threat of
having the Authorization Code intercepted. The technique involves the client
first creating a secret, and then using that secret again when exchanging the
Authorization Code for an access token. This way if the code is intercepted, it
will not be useful since the token request relies on the initial secret.
Client configuration
To enable PKCE you need to go to the Manage Services Page and create/edit a client. In “Protocol” tab under “Token Endpoint Authentication Method” select “No authentication” and in “Crypto” tab under “Proof Key for Code Exchange (PKCE) Code Challenge Method” select “SHA-256 hash algorithm”.
Protocol Flow
Because the PKCE-enhanced Authorization Code Flow builds upon the standard Authorization Code Flow, the steps are very similar.
First, the client creates and records a secret named the code_verifier. The
code_verifier is a high-entropy cryptographic random STRING using the
unreserved characters [A-Z] / [a-z] / [0-9] / “-” / “.” / “_” / “~”, with a
minimum length of 43 characters and a maximum length of 128 characters. Then the
client creates a code_challenge derived from the code_verifier by using one
of the following transformations on the code verifier:
plaincode_challenge = code_verifierS256code_challenge = BASE64URL-ENCODE(SHA256(ASCII(code_verifier)))
If the client is capable of using S256, it MUST use S256. Clients are
permitted to use plain only if they cannot support S256 for some technical
reason.
Note
There are various tools that generate these values such as https://tonyxu-io.github.io/pkce-generator/Then the code_challenge is sent in the Authorization Request along with the
transformation method (code_challenge_method).
Example request:
  HTTP/1.1 302 Found
  Location: ${AUTHORIZATION_ENDPOINT}?
      client_id=${CLIENT_ID}
      &scope=openid%20profile%20email
      &redirect_uri=${REDIRECT_URI}
      &response_type=code
      &code_challenge=${CODE_CHALLENGE}
      &code_challenge_method=S256
The Authorization Endpoint responds as usual but records code_challenge and
the code_challenge_method.
Example response:
  HTTP/1.1 302 Found
  Location: ${REDIRECT_URI}?code=fgtLHT
The client then sends the Authorization Code in the Access Token Request as
usual but includes the code_verifier secret generated in the first request.
Example request:
$ curl -X POST "${TOKEN_ENDPOINT}" \
    -d "grant_type=authorization_code" \
    -d "code=${CODE}" \
    -d "client_id=${CLIENT_ID}" \
    -d "redirect_uri=${REDIRECT_URI}" \
    -d "code_verifier=${CODE_VERIFIER}" | python -m json.tool
The Authorization Server transforms code_verifier and compares it to
code_challenge from the first request. Access is denied if they are not equal.
Example response:
{
  "access_token": "eyJraWQiOiJvaWRjIiwiYWxnIjoiUlMyNTYifQ...",
  "expires_in": 3599,
  "id_token": "eyJraWQiOiJvaWRjIiwiYWxnIjoiUlMyNTYifQ...",
  "scope": "openid email profile",
  "token_type": "Bearer"
}
Refresh flow
The following request allows obtaining an access token from a refresh token
using the grant_type value refresh_token:
| Parameter | Presence | Values |
|---|---|---|
client_id | Required | The identifier of the client. |
client_secret | Required | The secret value of the client. |
grant_type | Required | refresh_token |
refresh_token | Required | The value of the refresh token |
scope | Required | This parameter should contain openid at least |
Example request:
$ curl -X POST "${TOKEN_ENDPOINT}" \
    -u "${CLIENT_ID}":"${CLIENT_SECRET}" \
    -d "grant_type=refresh_token" \
    -d "refresh_token=${REFRESH_TOKEN}" \
    -d "scope=openid%20email%20profile" | python -m json.tool;
Example response:
{
  "access_token": "eyJraWQiOiJvaWRjIiwiYWx...",
  "expires_in": 3599,
  "id_token": "eyJraWQiOiJvaWRjIiwiYW...",
  "refresh_token": "eyabcdGciOiJub25...",
  "scope": "openid profile email",
  "token_type": "Bearer"
}
Refresh Request when using PKCE
To combine the refresh token grant type with PKCE you need to make the following request:
$ curl -X POST "${TOKEN_ENDPOINT}" \
    -d "client_id=${CLIENT_ID}" \
    -d "grant_type=refresh_token" \
    -d "refresh_token=${REFRESH_TOKEN}" \
    -d "scope=openid%20email%20profile" | python -m json.tool;
Token Exchange
To get a token from client B using a token issued for client A, the parameters of the request are:
| Parameter | Presence | Values |
|---|---|---|
grant_type | Required | urn:ietf:params:oauth:grant-type:token-exchange |
audience | Optional | Define the logical name of the service that the token will be used for |
subject_token | Required | The value of the access token |
subject_token_type | Required | urn:ietf:params:oauth:token-type:access_token (because this feature accepts access tokens only) |
scope | Optional | Define one or more scopes that are contained in the original token; otherwise all scopes will be selected |
Example request:
$ curl -X POST "${TOKEN_ENDPOINT}" \
    -u "${CLIENT_B_ID}":"${CLIENT_B_SECRET}" \
    -d "grant_type=urn:ietf:params:oauth:grant-type:token-exchange" \
    -d "subject_token=${ACCESS_TOKEN_A}" \
    -d "subject_token_type=urn:ietf:params:oauth:token-type:access_token" \
    -d "scope=openid%20profile%20offline_access" | python -m json.tool;
Example response:
{
  "access_token": "eyJraWQiOiJvaWRjIiwiYWxnIjoiUl...",
  "expires_in": 3599,
  "id_token": "eyJraWQiOiJvaWRjIiwiYWxnIjoiUl...",
  "refresh_token": "eyabcdGciOiJub25lIn0.eyJleHAiO...",
  "scope": "openid profile offline_access",
  "token_type": "Bearer"
}
Device Code
The device code flow enables OAuth clients on (input-constrained) devices to obtain user authorisation for accessing protected resources without using an on-device user-agent, provided that they have an internet connection.
1. Device Authorization Request
The client initiates the authorisation flow by requesting a set of verification codes from the Authorization Server by making an HTTP “POST” request to the device Authorization Endpoint. The client constructs the request with the following parameters:
| Parameter | Presence | Values |
|---|---|---|
client_id | Required | The identifier of the client |
scope | Optional | Define one or more scopes that are contained in the original token; otherwise all scopes will be selected |
Example request:
$ curl -X POST "${DEVICE_AUTHORIZATION_ENDPOINT}" \
    -H "Content-Type: application/x-www-form-urlencoded" \
    -d "client_id=${CLIENT_ID}" \
    -d "client_secret=${CLIENT_SECRET}" \
    -d "scope=openid%20email%20profile" | python -m json.tool
Example response:
{
  "device_code": "HvtHOpSah_Anupq-0dtzvN7cb-wcnwxytiMzpBZBN6E",
  "expires_in": 600,
  "interval": 5,
  "user_code": "NMEM-SDPK",
  "verification_uri": "https://aai.egi.eu/auth/realms/egi/device",
  "verification_uri_complete": "https://aai.egi.eu/auth/realms/egi/device?user_code=NMEM-SDPK"
}
2. User Interaction
After receiving a successful Authorization Response, the client displays or
otherwise communicates the user_code and the verification_uri to the end
user and instructs them to visit the URI in a user agent on a secondary device
(for example, in a browser on their mobile phone), and enter the user code.
3. Device Access Token Request
After displaying instructions to the user, the client makes an Access Token Request to the token endpoint. The request contains the following parameters:
| Parameter | Presence | Values |
|---|---|---|
grant_type | Required | urn:ietf:params:oauth:grant-type:device_code |
device_code | Required | The device verification code, device_code from the Device Authorization Response |
client_id | Required | The identifier of the client |
client_secret | Required | The secret value of the client |
scope | Optional | Define one or more scopes that are contained in the original token; otherwise all scopes will be selected |
Example request:
$ curl -X POST "${TOKEN_ENDPOINT}" \
    -H "Content-Type: application/x-www-form-urlencoded" \
    -d "grant_type=urn%3Aietf%3Aparams%3Aoauth%3Agrant-type%3Adevice_code" \
    -d "device_code=${DEVICE_CODE}" \
    -d "client_id=${CLIENT_ID}" \
    -d "client_secret=${CLIENT_SECRET}" \
    -d "scope=openid%20profile" | python -m json.tool
Example response:
{
  "access_token": "eyJraWQiOiJyc2ExIiwiYWxnIjoiUlMyNTYifQ.eyJzdWIiOiJhZG1pbiIs...",
  "expires_in": 3599,
  "id_token": "eyJraWQiOiJyc2ExIiwiYWxnIjoiUlMyNTYifQ.eyJzdWIiOiI5MDM0Mi...",
  "scope": "openid profile",
  "token_type": "Bearer"
}
Device Code with PKCE
To combine Device Code flow with PKCE you need to make the following requests:
1 - Device Authorization Request:
$ curl -X POST "${DEVICE_AUTHORIZATION_ENDPOINT}" \
    -H "Content-Type: application/x-www-form-urlencoded" \
    -d "client_id=${CLIENT_ID}" \
    -d "client_secret=${CLIENT_SECRET}" \
    -d "scope=openid%20email%20profile" \
    -d "code_challenge=${CODE_CHALLENGE}" \
    -d "code_challenge_method=S256" | python -m json.tool
2 - Device Access Token Request
$ curl -X POST "${TOKEN_ENDPOINT}" \
    -H "Content-Type: application/x-www-form-urlencoded" \
    -d "grant_type=urn%3Aietf%3Aparams%3Aoauth%3Agrant-type%3Adevice_code" \
    -d "device_code=${DEVICE_CODE}" \
    -d "client_id=${CLIENT_ID}" \
    -d "client_secret=${CLIENT_SECRET}" \
    -d "code_verifier=${CODE_VERIFIER}" | python -m json.tool
Client credentials
The parameters that are used in the Client Credentials flow are:
| Parameter | Presence | Values |
|---|---|---|
grant_type | Required | client_credentials |
scope | Optional | Define scope(s) to request |
Example request:
$ curl -X POST "${TOKEN_ENDPOINT}" \
    -u "${CLIENT_ID}":"${CLIENT_SECRET}" \
    -H "Content-Type: application/x-www-form-urlencoded" \
    -d "grant_type=client_credentials" \
    -d "scope=openid%20email%20profile%20eduperson_entitlement%20voperson_id" | python -m json.tool;
Example response:
{
  "access_token": "eyJraWQiOiJvaWRjIiwiYWxnIjoiUl...",
  "expires_in": 3599,
  "id_token": "eyJraWQiOiJvaWRjIiwiYWxnIjoiUl...",
  "not-before-policy": 0,
  "refresh_expires_in": 0,
  "scope": "openid eduperson_entitlement voperson_id profile email",
  "token_type": "Bearer"
}
Example Access Token (decoded payload):
{
  "azp": "1deb9fbd-44a3-4dff-ab4a-49e092e7f566",
  "clientAddress": "xxx.xxx.xxx.xxx",
  "clientHost": "xxx.xxx.xxx.xxx",
  "client_id": "1deb9fbd-44a3-4dff-ab4a-49e092e7f566",
  "exp": 1674473629,
  "iat": 1674470029,
  "iss": "https://aai.egi.eu/auth/realms/egi",
  "jti": "bdf15737-01ba-4e61-b5bc-3304d637e2b6",
  "scope": "openid eduperson_entitlement voperson_id profile email",
  "sub": "253b69f3-2325-4fd5-a26d-95e26b42bbaf@egi.eu",
  "typ": "Bearer",
  "voperson_id": "253b69f3-2325-4fd5-a26d-95e26b42bbaf@egi.eu"
}
Endpoints
The most important OIDC/OAuth2 endpoints are listed below:
| Endpoints | Production environment |
|---|---|
| Provider configuration | https://aai.egi.eu/auth/realms/egi/.well-known/openid-configuration |
| Issuer | https://aai.egi.eu/auth/realms/egi |
| Authorization | https://aai.egi.eu/auth/realms/egi/protocol/openid-connect/auth |
| Token | https://aai.egi.eu/auth/realms/egi/protocol/openid-connect/token |
| Device Authorization | https://aai.egi.eu/auth/realms/egi/protocol/openid-connect/auth/device |
| JSON Web Key Sets(JWKS) | https://aai.egi.eu/auth/realms/egi/protocol/openid-connect/certs |
| UserInfo | https://aai.egi.eu/auth/realms/egi/protocol/openid-connect/userinfo |
| Introspection | https://aai.egi.eu/auth/realms/egi/protocol/openid-connect/token/introspect |
| Logout | https://aai.egi.eu/auth/realms/egi/protocol/openid-connect/logout |
Authorization Endpoint
The Authorization Endpoint performs Authentication of the end user. This is done by sending the User Agent to the Authorization Server's Authorization Endpoint for Authentication and Authorisation, using request parameters defined by OAuth 2.0 and additional parameters and parameter values defined by OpenID Connect.
For more information please check the Authorization Code Flow.
Token Endpoint
To obtain an Access Token, an ID Token, and optionally a Refresh Token, the Client sends a Token Request to the Token Endpoint.
This endpoint is used in the following flows:
Device Authorization Endpoint
This endpoint has been introduced in the OAuth 2.0 Device Authorization Grant specification RFC8628 and it is used in Device Code Flow.
The OAuth client on the device interacts with the authorization server directly without presenting the request in a user agent, and the end user authorizes the request on a separate device. This interaction is defined as follows.
For more information please check the Device Code Flow.
JSON Web Key Sets Endpoint
This URL points to the Authorization Server’s JWK Set JWK document. The referenced document contains the signing key(s) the client uses to validate signatures from the authorization server.
UserInfo Endpoint
The UserInfo Endpoint is an OAuth 2.0 Protected Resource that returns Claims about the authenticated end user. To obtain the requested Claims about the end user, the Client makes a request to the UserInfo Endpoint using an Access Token obtained through OpenID Connect Authentication. These Claims are normally represented by a JSON object that contains a collection of name and value pairs for the Claims.
UserInfo Request
The Client sends the UserInfo Request using either HTTP GET or HTTP POST.
The Access Token obtained from an OpenID Connect Authentication Request must be
sent as a Bearer Token, per Section 2 of
OAuth 2.0 Bearer Token Usage (RFC6750).
It is recommended that the request use the HTTP GET method and the Access
Token be sent using the Authorization header field.
Example request:
$ curl -X GET "${USERINFO_ENDPOINT}"
    -H "Content-type: application/json"
    -H "Authorization: Bearer ${ACCESS_TOKEN}" | python -m json.tool;
Example response:
{
  "eduperson_assurance": [
    "https://refeds.org/assurance/IAP/low",
    "https://aai.egi.eu/LoA#Substantial"
  ],
  "eduperson_entitlement": [
    "urn:mace:egi.eu:group:demo.fedcloud.egi.eu:members:role=member#aai.egi.eu",
    "urn:mace:egi.eu:group:demo.fedcloud.egi.eu:role=member#aai.egi.eu",
    "urn:mace:egi.eu:group:demo.fedcloud.egi.eu:vm_operator:role=member#aai.egi.eu"
  ],
  "email": "jdoe@example.org",
  "email_verified": true,
  "family_name": "John",
  "given_name": "Doe",
  "name": "John Doe",
  "preferred_username": "jdoe",
  "sub": "1234567890123456789012345678901234567890123456789012345678901234@egi.eu",
  "voperson_id": "1234567890123456789012345678901234567890123456789012345678901234@egi.eu",
  "voperson_verified_email": ["jdoe@example.org"]
}
Introspection Endpoint
The introspection endpoint is an OAuth 2.0 endpoint that takes a parameter representing an OAuth 2.0 token and returns a JSON document representing the meta information surrounding the token, including whether this token is currently active.
Introspection Request
The protected resource calls the introspection endpoint using an HTTP POST
request with parameters sent as application/x-www-form-urlencoded.
Example request:
$ curl -X POST "${INTROSPECTION_ENDPOINT}" \
    -u "${CLIENT_ID}":"${CLIENT_SECRET}" \
    -H "Content-Type: application/x-www-form-urlencoded" \
    -d "token=${ACCESS_TOKEN}" | python -m json.tool;
Example response:
{
  "active": true,
  "auth_time": 1668613335,
  "authenticating_authority": "https://idp.admin.grnet.gr/idp/shibboleth",
  "azp": "token-portal",
  "client_id": "token-portal",
  "eduperson_assurance": [
    "https://refeds.org/assurance/IAP/low",
    "https://aai.egi.eu/LoA#Substantial"
  ],
  "eduperson_entitlement": [
    "urn:mace:egi.eu:group:demo.fedcloud.egi.eu:members:role=member#aai.egi.eu",
    "urn:mace:egi.eu:group:demo.fedcloud.egi.eu:role=member#aai.egi.eu",
    "urn:mace:egi.eu:group:demo.fedcloud.egi.eu:vm_operator:role=member#aai.egi.eu"
  ],
  "email": "jdoe@example.org",
  "email_verified": true,
  "exp": 1668616935,
  "iat": 1668613335,
  "iss": "https://aai.egi.eu/auth/realms/egi",
  "jti": "fecaf906-8578-4155-9783-f2083900b93c",
  "nonce": "30ccf6777eb726aae4f71fc72684c07c",
  "scope": "openid eduperson_entitlement voperson_id profile email",
  "session_state": "dc0feb13-8a3d-4b91-86c6-039ee27503df",
  "sid": "dc0feb13-8a3d-4b91-86c6-039ee27503df",
  "sub": "1234567890123456789012345678901234567890123456789012345678901234@egi.eu",
  "typ": "Bearer",
  "voperson_id": "1234567890123456789012345678901234567890123456789012345678901234@egi.eu",
  "voperson_verified_email": ["jdoe@example.org"]
}
Logout Endpoint
The EGI Check-in OpenID Provider supports user logout based on the OpenID Connect RP-Initiated Logout.
The Logout Endpoint is normally obtained via the end_session_endpoint element
of Check-in’s Provider Configuration (see Endpoints table).
Parameters used in the logout request are detailed below:
id_token_hint: The ID Token previously issued by Check-in to your Relying Party (RP) and provided to the Logout Endpoint as a hint regarding the end user’s current authenticated session with the client. It indicates the identity of the end user that the RP is requesting Check-in to log out. If theid_token_hintparameter is omitted, the user may be prompted to confirm the logout.client_id: This parameter is used to specify the Client Identifier whenpost_logout_redirect_uriis specified butid_token_hintis not.post_logout_redirect_uri: URI to which the RP is requesting that the end user’s browser be redirected after a logout has been performed. This URI should use the HTTPS scheme and the value must have been previously registered in the configuration of the Service in EGI Federation Registry. Note that you need to include either theclient_idorid_token_hintparameter in case thepost_logout_redirect_uriis included.
You can use either HTTP GET or HTTP POST to send the logout request to the Logout Endpoint.
Example Request
  HTTP/1.1 302 Found
  Location: ${LOGOUT_ENDPOINT}?
    id_token_hint=${ID_TOKEN}
Example Request with redirection
  HTTP/1.1 302 Found
  Location: ${LOGOUT_ENDPOINT}?
    post_logout_redirect_uri=${POST_LOGOUT_REDIRECT_URI}
    &client_id=${CLIENT_ID}
Claims-based authorisation
As mentioned in the General Information, omitting authorisation checks may lead to abuse of the service.
EGI Check-in provides information about the authenticated user that may be used by Service Providers in order to control user access to resources. This information is provided by the EGI Check-in OpenID Provider in the form of OIDC claims. The table below lists the claims that are relevant for user authorisation:
| Description | OIDC Claim |
|---|---|
| VO/group membership/roles of the authenticated user | eduperson_entitlement |
| Capabilities | eduperson_entitlement |
| GOCDB roles | eduperson_entitlement |
| Identity Assurance | eduperson_assurance |
Example OIDC Client Configurations
Keycloak
If you are using Keycloak as an OIDC Relying Party, then you need to follow the steps below in order to register EGI Check-in as an Identity Provider:
Access the administrator console of your Keycloak instance and navigate to “Identity Providers” and then select “OpenID Connect v1.0”
In the next page, complete the following fields:
- Alias:
egi-check-in-oidc - Display name:
EGI Check-in
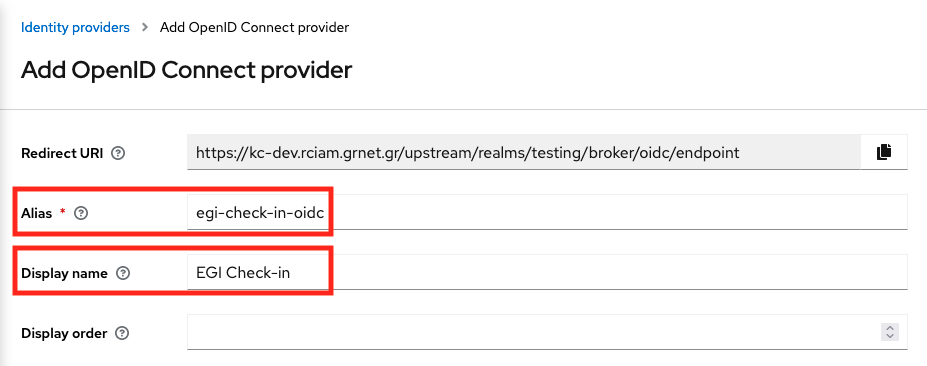
Scroll down, and complete the rest options:
- Discovery endpoint:
https://aai.egi.eu/auth/realms/egi/.well-known/openid-configuration - Client ID:
<YOUR_CLIENT_ID> - Client Secret:
<YOUR_CLIENT_SECRET>
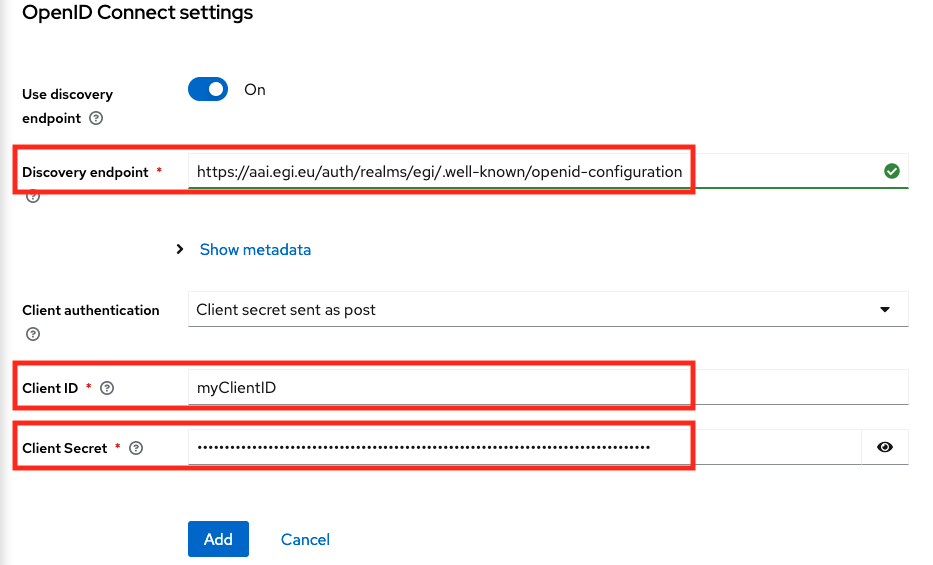
And then click on the “Add” button.
- Alias:
After adding EGI Check-in IdP, scroll down to the “OpenID Connect settings” section and expand the “Advanced” option and then add the scopes that the Service needs. For example:
Scopes:
openid voperson_id email profile eduperson_entitlement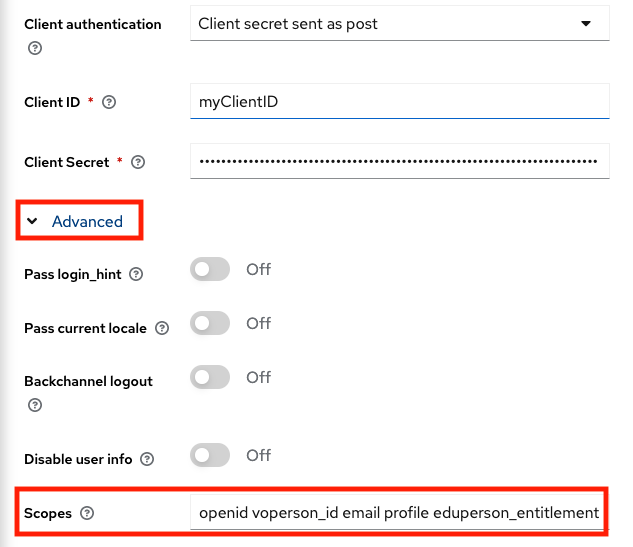
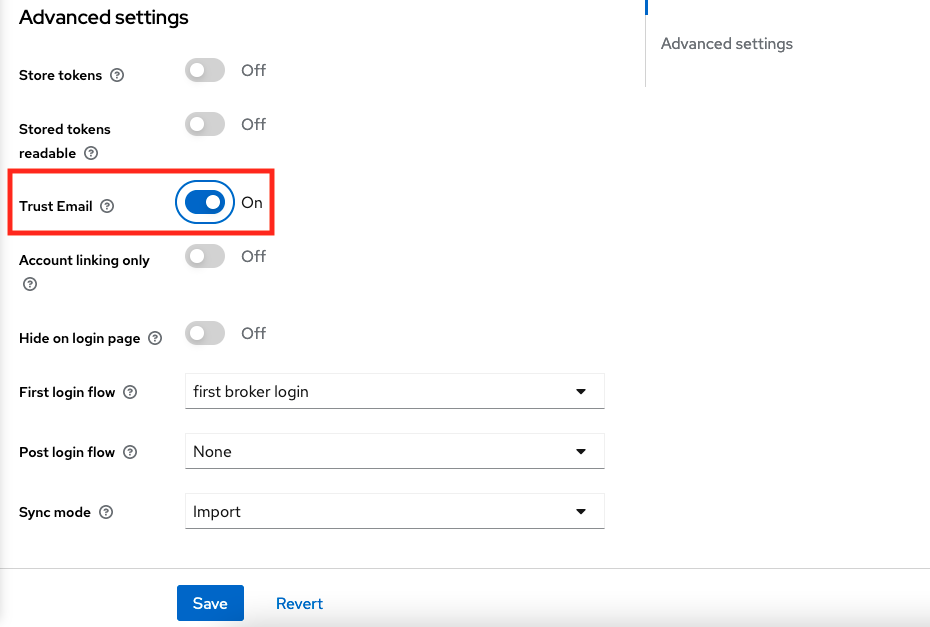
Then, scroll down to the “Advanced settings” section and enable the “Trust Email” option and click on “Save” button.
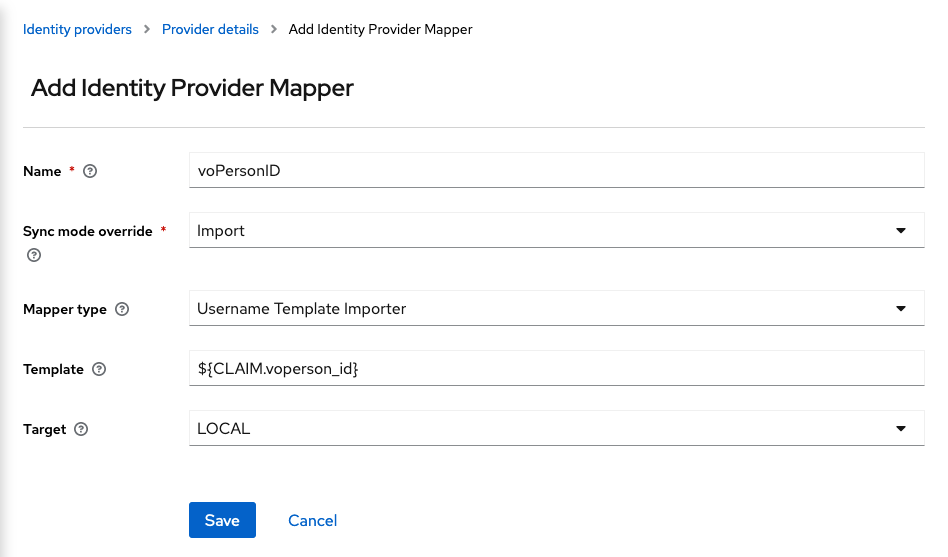
Next, you will need to add two mappers to store the
voperson_idand theeduperson_entitlementclaims because Keycloak can map only the standard claims. Go to the “Mappers” tab and then click on “Add Mapper”.For the
voperson_idclaim you will need to add the following options:- Name:
voPersonID - Sync Mode Override:
import - Mapper Type:
Username Template Importer - Template:
${CLAIM.voperson_id} - Target:
LOCAL
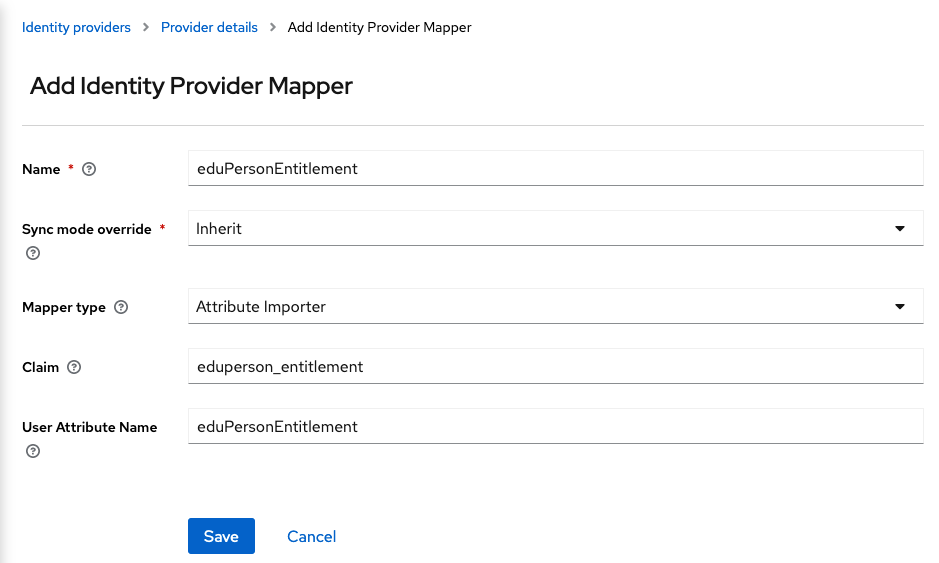
And for the
eduperson_entitlementclaim:- Name:
eduPersonEntitlement - Sync Mode Override:
Inherit - Mapper Type:
Attribute Importer - Claim:
eduperson_entitlement - User Attribute Name:
eduPersonEntitlement
- Name:
simple-oidc-client-php
In this guide we will demonstrate how to install and configure a Simple OIDC Client.
Install simple-oidc-client-php
This guide assumes the Apache HTTP server has been installed and the document
root is /var/www/html
Move to the apache document root and download and extract simple-oidc-client-php.tar.gz.
Configure Client
Login to the EGI Federation Registry
Then create a new service or edit your existing service. In General tab fill
all the required fields. For Integration Environment select Demo. In
Protocol Specific tab select as Protocol the OIDC Service and then in the
Redirect URI(s) insert your simple-oidc-client-php URL (e.g.
http://localhost/simple-oidc-client-php/refreshtoken.php). This URL must link
to refreshtoken.php which is located in simple-oidc-client-php directory.
Next, in Scope select the scopes that your service needs. Then, submit the
form and self approve it. Finally you should get a pair of Client ID and
Client Secret.
Configure simple-oidc-client-php
Now that you have everything you need, you can configure your login settings. Go
to your terminal and open config.php with your favourite text editor.
Example:
$ vi simple-oidc-client-php/config.php
Let’s go quickly through the settings:
titlerequired, the title on the navigation barimgrequired, the source of the logoscope_infooptional, a message that informs the user for the application requirementsissuerrequired, the base URL of our IdentityServer instance. This will allow oidc-client to query the metadata endpoint so it can validate the tokensclient_idrequired, the ID of the client we want to use when hitting the Authorization Endpointclient_secretoptional, a value the offers better security to the message flowpkceCodeChallengeMethodoptional, a string that defines the code challenge method for PKCE. Choose betweenplainorS256.redirect_urlrequired, the redirect URL where the client and the browser agree to send and receive correspondingly the codescopesDefinerequired, defines the scopes the client supportsrefresh_token_noteoptional, info for the refresh tokenaccess_token_noteoptional, info for the access tokenmanage_token_noteoptional, message the informs the user where can manage his tokensmanageTokensoptional, URL of the manage tokens servicesessionNamerequired, define the name of the cookie sessionsessionLifetimerequired, define the duration of the session. This must be equal to the validity time of the access token.
You must change the followings options based on your Service configuration you setup earlier:
issuerclient_idclient_secretredirect_urlscopesDefinesessionName(based on the installation path of the portal)
An example configuration follows:
<?php
// index.php interface configuration
$title = "Generate Tokens";
$img = "https://clickhelp.co/images/feeds/blog/2016.05/keys.jpg";
$scope_info = "This service requires the following permissions for your account:";

// Client configuration
$issuer = "https://aai-demo.egi.eu/auth/realms/egi";
$client_id = "CHANGE_ME";
$client_secret = "CHANGE_ME";  // comment if you are using PKCE
// $pkceCodeChallengeMethod = "S256";   // uncomment to use PKCE
$redirect_url = "http://localhost/simple-oidc-client-php/refreshtoken.php";
// add scopes as keys and a friendly message of the scope as value
$scopesDefine = array(
    'openid' => 'log in using your identity',
    'email' => 'read your email address',
    'profile' => 'read your basic profile info',
);
// refreshtoken.php interface configuration
$refresh_token_note = "NOTE: New refresh tokens expire in 12 months.";
$access_token_note = "NOTE: New access tokens expire in 1 hour.";
$manage_token_note = "You can manage your refresh tokens in the following link: ";
$manageTokens = $issuer . "manage/user/services";
$sessionName = "simple-oidc-client-php";
$sessionLifetime = 60*60;  // must be equal to access token validation time in seconds
Common issues
Error messages referring to missing code_challenge, code_challenge_method or code_verifier HTTP parameter
If you get error messages containing the PKCE HTTP parameters, probably the PKCE mode is enabled in your Service Configuration but the Application is not performing the PKCE mode.
To solve this, you need to follow the steps below:
- Login to Federation Registry
- Open your Service Configuration
- Click on the “Protocol Specific” tab and scroll down to “Proof Key for Code Exchange (PKCE) Code Challenge Method” and select “PKCE will not be used for this service”
- Click on “Submit” to apply the reconfiguration request
Error messages referring to invalid_code
If you try to perform the Authorization Code flow and you get an invalid_code
error message, probably the Application sends the Authorization Request to the
Authorization Endpoint of the Keycloak based EGI Check-in OP and then sends the
code to the Token Endpoint of the MITREid Connect based EGI Check-in OP or
vice versa.
To fix this you need to verify that you have updated all the OIDC Endpoints with the Keycloak ones. You can find all the OIDC Endpoints of Keycloak in the Endpoint table.
Error messages referring to the redirect_uri
If you try to perform the Authorization Code flow and you get an
invalid_redirect_uri error, probably the redirect_uri in the Authorization
Request mismatches with the Allowed Redirect URIs in the Service Configuration.
To solve this, you need to follow the steps below:
- Login to Federation Registry
- Open your Service Configuration
- Click on the “Protocol Specific” tab and in the “Redirect URI(s)” edit the URI.
- Click on “Submit” to apply the reconfiguration request
UserInfo invalid_token or 401 Unauthorized error response
If you are trying to make a request to the UserInfo Endpoint and the response
contains the invalid_token error message, probably you are using an invalid
Token or the UserInfo Endpoint is wrong.
To solve this, please make sure the that:
- You have obtained an Keycloak issued Access Token and you make a request to the Keycloak based UserInfo Endpoint
- You have added the Access Token to the Authorization header of the request
502 Bad Gateway error after redirecting back to the Service
If you are using NGINX as a Reverse Proxy, and you are getting the following error message in the logs:
upstream sent too big header while reading response header from upstream
Then you need to increase the size of the buffer by adding the following options in the vhost configuration:
proxy_buffers 4 256k;
proxy_buffer_size 128k;
proxy_busy_buffers_size 256k;
Size of the Tokens
The size of an Access Token is around 1400 characters, depending on the information (claims) included in the payload of the JWT. So make sure that your OIDC implementation can handle large Tokens.
Token Introspection errors
The Token Introspection is available to all the clients that are using any
authentication method (client_secret_basic, client_secret_post,
client_secret_jwt or private_key_jwt) (Confidential Clients) to the Token
Endpoint. Public Clients (clients that do not use any authentication method)
will not be able to get a successful response from the Introspection Endpoint.
PKCE errors
If you are not using PKCE (Proof Key for Code Exchange), please make sure to disable the “PKCE Code Challenge Method” in the Service configuration in EGI Federation Registry, otherwise you will get the following HTTP response during the authentication flow:
error=invalid_request&error_description=Missing parameter: code_challenge_method
Device Code Grant
If you are using a confidential client with the Device Code grant, please make
sure that the client_secret is present in the request to the Device Code
Endpoint either as HTTP Basic or HTTP POST parameter (see
Device Authorization Request).
Token Exchange Grant
If you are using the Token Exchange grant, please make sure that the audience
(Optional) defines the logical name of the service that the token will be used
for; when specified, it must match the client ID of a client registered in
Check-in otherwise an invalid_client error is returned
("description": "audience not found")
Integrating Science Gateways with RCauth for obtaining (proxy) certificates
In order for Science Gateways (VO portals) to obtain RFC proxy certificates derived from personal end-entity certificates, an EGI Science Gateway can make use of the IGTF-approved IOTA-type RCauth.eu online CA. The actual integration goes via an intermediary service, called a Master Portal. EGI is running two Master Portal instances, one development, one production instance.
| Endpoint | Production environment |
|---|---|
| Provider configuration | https://aai.egi.eu/mp-oa2-server/.well-known/openid-configuration |
| Client registration | https://aai.egi.eu/mp-oa2-server/register |
| Authorization | https://aai.egi.eu/mp-oa2-server/authorize |
| Token | https://aai.egi.eu/mp-oa2-server/token |
| JSON Web Key Sets(JWKS) | https://aai.egi.eu/mp-oa2-server/certs |
| UserInfo | https://aai.egi.eu/mp-oa2-server/userinfo |
| Endpoint | Development environment |
|---|---|
| Provider configuration | https://masterportal-pilot.aai.egi.eu/mp-oa2-server/.well-known/openid-configuration |
| Client registration | https://masterportal-pilot.aai.egi.eu/mp-oa2-server/register |
| Authorization | https://masterportal-pilot.aai.egi.eu/mp-oa2-server/authorize |
| Token | https://masterportal-pilot.aai.egi.eu/mp-oa2-server/token |
| JSON Web Key Sets(JWKS) | https://masterportal-pilot.aai.egi.eu/mp-oa2-server/certs |
| UserInfo | https://masterportal-pilot.aai.egi.eu/mp-oa2-server/userinfo |
Registering a client at the Master Portal
In order to register a new client for your VO portal go to:
- EGI Development instance: https://masterportal-pilot.aai.egi.eu/mp-oa2-server/register
- EGI Production instance: https://aai.egi.eu/mp-oa2-server/register
Note
Make sure to store theclient_id and
client_secret in a secure placeIn order to get the client approved, send an email to the administrator of the
EGI Master Portal using checkin-support <AT> mailman.egi.eu.
Detailed information
For further and detailed instructions on the integration flow, see the generic RCAuth.eu MasterPortal VOPortal integration guide
SSH key authentication for proxy retrieval
The EGI MasterPortal also allows users to authenticate using SSH key pair, in order to retrieve proxy certificates from the MasterPortal. Users need to first upload the public key via a self-service portal, https://aai.egi.eu/sshkeys/. About once a week they need to follow a web-flow to ensure a long-lived proxy certificate is present in MasterPortal, e.g. by going to https://aai.egi.eu/vo-portal/. They can then obtain a proxy certificate by doing
$ ssh proxy@ssh.aai.egi.eu
and storing the output in /tmp/x509up_u$(id -u)
Generic information for users on how to do this can be found at Instructions for end users on how to use the SSH key authN for proxy retrieval. Alternatively VO portals could implement such functionality themselves by using the API described at the Master Portal sshkey endpoint description.
User attributes
This section defines the attributes that can be made available to services connected to Check-in.
1. Community User Identifier
| attribute name | Community User Identifier |
|---|---|
| description | The User’s Community Identifier is a globally unique, opaque, persistent and non-reassignable identifier identifying the user. For users whose community identity is managed by Check-in, this identifier is of the form <uniqueID>@egi.eu. The <uniqueID> portion is an opaque identifier issued by Check-in |
| SAML Attribute(s) | urn:oid:1.3.6.1.4.1.25178.4.1.6 (voPersonID) |
| OIDC scope |
|
| OIDC claim(s) | voperson_id |
| OIDC claim location |
|
| origin | The Community User Identifier is assigned by Check-in or an external AAI service managing the community identity of the user |
| changes | No |
| multiplicity | No |
| availability | Always |
| example | ef72285491ffe53c39b75bdcef46689f5d26ddfa00312365cc4fb5ce97e9ca87@egi.eu |
| notes | Use Community User Identifier within your application as the unique-identifier key for the user. Obtaining the Community User Identifier from the sub claim using the openid scope for OIDC Relying Parties or from eduPersonUniqueId for SAML Service Providers has been deprecated. OIDC RPs should request either the voperson_id or aarc scope to obtain the Community User Identifier. SAML PRs should request the voPersonID attribute to obtain the Community User Identifier. |
| status | Stable |
2. Display Name
| attribute name | Display Name |
|---|---|
| description | The user’s full name, in a displayable form |
| SAML Attribute(s) | urn:oid:2.16.840.1.113730.3.1.241 (displayName) |
| OIDC scope |
|
| OIDC claim(s) | name |
| OIDC claim location | UserInfo Endpoint |
| origin | Provided by user’s Identity Provider |
| changes | Yes |
| multiplicity | Single-valued |
| availability | Always |
| example | John Doe |
| notes | - |
| status | Stable |
3. Given Name
| attribute name | Given Name |
|---|---|
| description | The user’s first name |
| SAML Attribute(s) | urn:oid:2.5.4.42 (givenName) |
| OIDC scope |
|
| OIDC claim(s) | given_name |
| OIDC claim location | UserInfo Endpoint |
| origin | Provided by user’s Identity Provider |
| changes | Yes |
| multiplicity | Single-valued |
| availability | Always |
| example | John |
| notes | - |
| status | Stable |
4. Family Name
| attribute name | Family Name |
|---|---|
| description | The user’s last name |
| SAML Attribute(s) | urn:oid:2.5.4.4 (sn) |
| OIDC scope |
|
| OIDC claim(s) | family_name |
| OIDC claim location | UserInfo Endpoint |
| origin | Provided by user’s Identity Provider |
| changes | Yes |
| multiplicity | Single-valued |
| availability | Always |
| example | Doe |
| notes | - |
| status | Stable |
5. Username
| attribute name | Username |
|---|---|
| description | The username by which the user wishes to be referred to |
| SAML Attribute(s) | urn:oid:0.9.2342.19200300.100.1.1 (uid) |
| OIDC scope |
|
| OIDC claim(s) | preferred_username |
| OIDC claim location |
|
| origin | Check-in assigns this attribute on user registration |
| changes | No |
| multiplicity | Single-valued |
| availability | Always |
| example | jdoe |
| notes | The Service Provider MUST NOT rely upon this value being unique |
| status | Stable |
6. Email Address
| attribute name | Email Address |
|---|---|
| description | The user’s email address |
| SAML Attribute(s) | urn:oid:0.9.2342.19200300.100.1.3 (mail) |
| OIDC scope |
|
| OIDC claim(s) | email |
| OIDC claim location |
|
| origin | Provided by user’s Identity Provider |
| changes | Yes |
| multiplicity | Single-valued |
| availability | Always |
| example | john.doe@example.org |
| notes | This MAY NOT be unique and is NOT suitable for use as a primary key |
| status | Stable |
7. Verified email flag
| attribute name | Verified email flag |
|---|---|
| description | True if the user’s email address has been verified; otherwise false |
| SAML Attribute(s) | See Verified email list |
| OIDC scope |
|
| OIDC claim(s) | email_verified |
| OIDC claim location |
|
| origin | Check-in assigns this attribute on user registration |
| changes | Yes |
| multiplicity | Single-valued |
| availability | Always |
| example | true |
| notes | This claim is available only in OpenID Connect |
| status | Stable |
8. Verified email list
| attribute name | Verified email list |
|---|---|
| description | A list of user’s email addresses that have been verified |
| SAML Attribute(s) | urn:oid:1.3.6.1.4.1.25178.4.1.14 (voPersonVerifiedEmail) |
| OIDC scope |
|
| OIDC claim(s) | voperson_verified_email |
| OIDC claim location |
|
| origin | Check-in or the user’s Identity Provider |
| changes | Yes |
| multiplicity | Multi-valued |
| availability | Not always |
| example |
|
| notes | - |
| status | Experimental |
9. Affiliation
| attribute name | Affiliation |
|---|---|
| description | The user’s affiliation within a particular security domain (scope) |
| SAML Attribute(s) | urn:oid:1.3.6.1.4.1.25178.4.1.11 (voPersonExternalAffiliation) |
| OIDC scope | voperson_external_affiliation |
| OIDC claim(s) | voperson_external_affiliation |
| OIDC claim location |
|
| origin | When available, this information originates from the user’s authenticating Identity Provider |
| changes | Yes |
| multiplicity | Multi-valued |
| availability | Not always |
| example |
|
| notes | Service Providers are encouraged to validate the scope of this attribute |
| status | Stable |
10. Groups
| attribute name | Groups |
|---|---|
| description | The user’s group/VO membership/role information expressed as entitlements |
| SAML Attribute(s) | urn:oid:1.3.6.1.4.1.5923.1.1.1.7 (eduPersonEntitlement) |
| OIDC scope | eduperson_entitlement |
| OIDC claim(s) | eduperson_entitlement |
| OIDC claim location |
|
| origin | Group memberships are managed by group administrators |
| changes | Yes |
| multiplicity | Multi-valued |
| availability | Not always |
| example |
|
| notes | - |
| status | Stable |
11. Capabilities
| attribute name | Capabilities |
|---|---|
| description | This attribute describes the resource or child-resource a user is allowed to access, optionally specifying certain actions the user is entitled to perform, as described in AARC-G027 |
| SAML Attribute(s) | urn:oid:1.3.6.1.4.1.5923.1.1.1.7 (eduPersonEntitlement) |
| OIDC scope | eduperson_entitlement |
| OIDC claim(s) | eduperson_entitlement |
| OIDC claim location |
|
| origin | Capabilities are managed by Check-in |
| changes | Yes |
| multiplicity | Multi-valued |
| availability | Not always |
| example |
|
| notes | - |
| status | Stable |
12. GOCDB Roles
| attribute name | GOCDB Roles |
|---|---|
| description | The user’s GOCDB role information expressed as entitlements |
| SAML Attribute(s) | urn:oid:1.3.6.1.4.1.5923.1.1.1.7 (eduPersonEntitlement) |
| OIDC scope | eduperson_entitlement |
| OIDC claim(s) | eduperson_entitlement |
| OIDC claim location |
|
| origin | The roles are managed in GOCDB |
| changes | Yes |
| multiplicity | Multi-valued |
| availability | Not always |
| example |
|
| notes | - |
| status | Stable |
13. Assurance
| attribute name | Assurance |
|---|---|
| description | Assurance of the identity of the user, following REFEDS Assurance Framework (RAF) and the EGI AAI Assurance Profiles. The following RAF values are qualified and automatically set for all Community identities:
|
| SAML Attribute(s) | urn:oid:1.3.6.1.4.1.5923.1.1.1.11 (eduPersonAssurance) |
| OIDC scope | openid |
| OIDC claim(s) | eduperson_assurance |
| OIDC claim location |
|
| origin | Check-in assigns this attribute on user registration |
| changes | Yes |
| multiplicity | Multi-valued |
| availability | Always |
| example |
|
| notes | - |
| status | Stable |
14. CertEntitlement
| attribute name | CertEntitlement |
|---|---|
| description | Provides information about the user’s certificate subject(s) and the associated VO(s) |
| SAML Attribute(s) | Not available |
| OIDC scope | cert_entitlement |
| OIDC claim(s) | cert_entitlement |
| OIDC claim location |
|
| origin | VO/group management tools integrated with Check-in |
| changes | Yes |
| multiplicity | Multi-valued |
| availability | Not always |
| example | [{"cert_subject_dn": "/C=GR/O=HellasGrid/...","cert_iss": "/C=GR/O=HellasGrid/...","eduperson_entitlement": "urn:mace:egi.eu:group:checkin-integration:role=VO-Admin#aai.egi.eu"}] |
| notes | This is available only for DIRAC |
| status | Stable |
15. SSH Public Key
| attribute name | SSH Public Key |
|---|---|
| description | Provides information about the user’s SSH public key(s) |
| SAML Attribute(s) | urn:oid:1.3.6.1.4.1.24552.500.1.1.1.13 (sshPublicKey) |
| OIDC scope | ssh_public_key |
| OIDC claim(s) | ssh_public_key |
| OIDC claim location | UserInfo Endpoint |
| origin | Added SSH public key(s) in user’s Check-in Profile |
| changes | Yes |
| multiplicity | Multi-valued |
| availability | Not always |
| example |
|
| notes | - |
| status | Experimental |
16. ORCID iD
| attribute name | ORCID iD |
|---|---|
| description | Provides information about the user’s ORCID iD |
| SAML Attribute(s) | urn:oid:1.3.6.1.4.1.5923.1.1.1.16 (eduPersonOrcid) |
| OIDC scope | orcid |
| OIDC claim(s) | orcid |
| OIDC claim location | UserInfo Endpoint |
| origin | ORCID Identity Provider |
| changes | No |
| multiplicity | Single-valued |
| availability | Not always |
| example | https://orcid.org/XXXX-XXXX-XXXX-XXXX |
| notes | The attribute is available when logging in using ORCID |
| status | Experimental |
17. Subject Distinguished Name (DN) of user’s X.509 certificate
| attribute name | Subject Distinguished Name (DN) of user’s X.509 certificate |
|---|---|
| description | The Subject Distinguished Name of an X.509 certificate held by the person. |
| SAML Attribute(s) | 1.3.6.1.4.1.25178.4.1.3 (voPersonCertificateDN) |
| OIDC scope |
|
| OIDC claim(s) | voperson_certificate_dn |
| OIDC claim location | UserInfo Endpoint |
| origin | Check-in or the user’s Identity Provider |
| changes | Yes |
| multiplicity | Multi-valued |
| availability | Not always |
| example | /C=XX/O=YYY/OU=ZZZ/CN=John Doe |
| notes | - |
| status | Experimental |
18. Issuer Distinguished Name (DN) of user’s X.509 certificate
| attribute name | Issuer Distinguished Name (DN) of user’s X.509 certificate |
|---|---|
| description | The Subject Distinguished Name of the X.509 certificate issuer |
| SAML Attribute(s) | 1.3.6.1.4.1.25178.4.1.4 (voPersonCertificateIssuerDN) |
| OIDC scope |
|
| OIDC claim(s) | voperson_certificate_issuer_dn |
| OIDC claim location | UserInfo Endpoint |
| origin | Check-in or the user’s Identity Provider |
| changes | Yes |
| multiplicity | Multi-valued |
| availability | Not always |
| example | /C=XX/O=YYY/OU=ZZZ/CN=Example CA |
| notes | - |
| status | Experimental |
User authorisation
The following information about the authenticated user can be provided by EGI Check-in in order to control user access to resources:
- VO/group membership and role information about the authenticated user
- Capabilities
- Identity Assurance
- GOCDB roles
VO/group membership and role information
Background
VO/group membership and role information is encoded in entitlements
(eduPersonEntitlement attribute values in SAML or eduperson_entitlement
claim in OIDC). These entitlements are typically used to indicate access rights
to protected resources. Entitlements are multi-valued, with each value formatted
as a URN.
Syntax
An entitlement value expressing group membership and role information has the following syntax (components enclosed in square brackets are OPTIONAL):
urn:mace:egi.eu:group:<GROUP>[:<SUBGROUP>*][:role=<ROLE>]#<GROUP-AUTHORITY>
where:
<GROUP>is the name of a VO, research collaboration or a top level arbitrary group.<GROUP>names are unique within theurn:mace:egi.eu:groupnamespace;- zero or more
<SUBGROUP>components represent the hierarchy of subgroups in the<GROUP>; specifying sub-groups is optional - the optional
<ROLE>component is scoped to the rightmost (sub)group; if no group information is specified, the role applies to the VO <GROUP-AUTHORITY>is a non-empty string that indicates the authoritative source for the entitlement value. For example, it can be the FQDN of the group management system that is responsible for the identified group membership information
Example:
urn:mace:egi.eu:group:fedcloud.egi.eu:role=vm_operator#aai.egi.eu
Capabilities
Background
The user’s capability information is encoded in entitlements
(eduPersonEntitlement attribute values in SAML or eduperson_entitlement
claim in OIDC). These entitlements are typically used to indicate access rights
to protected resources. Entitlements are multi-valued, with each value formatted
as a URN following the syntax defined in
AARC-G027.
Syntax
An entitlement value expressing a capability has the following syntax (components enclosed in square brackets are OPTIONAL):
<NAMESPACE>:res:<RESOURCE>[:<CHILD-RESOURCE>]...[:act:<ACTION>[,<ACTION>]...]#<AUTHORITY>
where:
<NAMESPACE>is controlled by the e-infrastructure, research infrastructure or research collaboration that manages the capability. The<NAMESPACE>of capabilities managed by Check-in is set tourn:mace:egi.eu, while, generally, it is in the form ofurn:<NID>:<DELEGATED-NAMESPACE>[:<SUBNAMESPACE>]...where:<NID>is the namespace identifier associated with a URN namespace registered with IANA2, ensuring global uniqueness. Implementers SHOULD use one of the existing registered URN namespaces, such asurn:mace[MACE].<DELEGATED-NAMESPACE>is a URN sub-namespace delegated from one of the IANA registered NIDs to an organisation representing the e-infrastructure, research infrastructure or research collaboration. It is RECOMMENDED that a publicly accessible URN value registry for each delegated namespace be provided.
The literal string
"res"indicates that this is a resource-specific entitlement as opposed to, for example, an entitlement used for expressing group membership AARC-G002.<RESOURCE>is the name of the resource. Whether the name should be unique is an implementation decision.An optional list of colon-separated
<CHILD-RESOURCE>components represents a specific branch of the hierarchy of resources under the identified<RESOURCE>.An optional list of comma-separated
<ACTION>s MAY be included, which, if present, MUST be prefixed with the literal string “act”. This component MAY be used for further specifying the actions a user is entitled to do at a given resource. Note that the list of<ACTION>s is scoped to the rightmost child-resource; if no child-resource information is specified, actions apply to the top level resource. The interpretation of a capability without actions specified is an implementation detail.<AUTHORITY>is a mandatory and non-empty string that indicates the authoritative source of the capability. This SHOULD be used to further specify the exact issuing instance. For example, it MAY be the FQDN of the service that issued that specific capability. The<AUTHORITY>is specified in the f-component RFC8141 of the URN; thus, it is introduced by the number sign ("#") character and terminated by the end of the URN. All characters must be encoded according to RFC8141. Hence, the<AUTHORITY>MUST NOT be considered when determining equivalence (Section 3 in RFC8141) of URN-formatted capabilities. The<AUTHORITY>of capabilities managed by Check-in is typically set toaai.egi.eu.
Example:
urn:mace:egi.eu:res:rcauth#aai.egi.eu
Identity Assurance
Based on the authentication method selected by the user, the EGI proxy assigns a
Identity Assurance, which is conveyed to the SP through both the
eduPersonAssurance attribute and the Authentication Context Class
(AuthnContextClassRef) of the SAML authentication response. EGI Check-in uses
Assurance Profiles which distinguish between three Identity Assurance levels,
similarly to the
eID Assurance Framework (eIDAF).
Each level is represented by a URI as follows:
- Low: Authentication through a social identity provider or other low
identity assurance provider:
https://aai.egi.eu/LoA#Low - Substantial: Password/X.509 authentication at the user's home IdP:
https://aai.egi.eu/LoA#Substantial - High: Substantial + multi-factor authn (not yet supported, TBD):
https://aai.egi.eu/LoA#High
Moreover, EGI Check-in follows the
REFEDS Assurance framework (RAF).
The EGI Check-in conveys any RAF values provided by the IdP directly to the SP,
through the aforementioned methods. Furthermore, Check-in will append into the
User’s profile any additional LoA, if the user is eligible for it. For example,
a user having a Verified Email is eligible for the RAF value
https://refeds.org/assurance/IAP/low
Some EGI SPs have been configured to provide limited access (or not to accept at all) credentials with the Low LoA.
Note: When logging in through the EGI SSO IdP, the LoA is determined based on the selected authentication mechanism as follows:
- Username/password credentials → Low
- X.509 certification → Substantial
GOCDB Roles
Background
GOCDB roles, as per
GOCDB documentations, are
encoded (eduPersonEntitlement attribute values in SAML or
eduperson_entitlement claim in OIDC). These entitlements are typically used to
indicate access rights to protected resources. Entitlements are multi-valued,
with each value formatted as a URN.
Syntax
An entitlement value expressing GOCDB roles has the following syntax (components enclosed in square brackets are OPTIONAL):
urn:mace:egi.eu:goc.egi.eu:<PRIMARY_KEY>:<ON_ENTITY>:<USER_ROLE>@egi.eu
where:
<PRIMARY_KEY>is the primary key for the user role, e.g. “123G0”<ON_ENTITY>is the name of the entity on which the user role applies to, e.g. “GRIDOPS-GOCDB”<USER_ROLE>is the user’s role, e.g. “Site Operations Manager”
Example:
urn:mace:egi.eu:goc.egi.eu:100453G0:GRIDOPS-CheckIn:Site+Administrator@egi.eu