VOMS
Authentication
Some EGI services authentication is based on X.509 certificates. The certificates are issued by Certification Authorities (CAs) part of the EUGridPMA federation which is also part of IGTF (International Global Trust Federation).
The role of a Certification Authority (CA) is to guarantee that users are who they claim to be and are entitled to own their certificate. It is up to the users to discover which CA they should contact. In general, CAs are organised geographically and by research institutes. Each CA has its own procedure to release certificates.
EGI sites, endpoints and tools accept certificates part of the EUGridPMA distribution. If your community VO is enabled on that site, your certificate will be accepted by that site since all certificates are recognized at site level.
Usually, a certificate can be installed by command-line tools, but they can also be stored in the web browser to access EGI web tools and services.
Get a Certificate
The list of EGI recognised CAs provides a clickable map to find your nearby CA. Several of these offer the option to get an ’eScience Personal’ certificate online from the Terena Certificate Service CA. Check the countries where this is available.
If eScience Personal certificate is not available in your country, then request a certificate from a regular IGTF CA. The request is normally generated using either a web-based interface or console commands. Details of which type of request a particular CA accepts can be found on each CA’s site.
For a web-based certificate request, a form must usually be filled in with information such as the name of the user, home institute, etc. After submission, a pair of private and public keys are generated, together with a request for the certificate containing the public key and the user data. The request is then sent to the CA, while the private key stays in the browser, hence the same browser must be used to retrieve the certificate once it is issued.
Users must usually install the CA root certificate in their browser first. This is because the CA has to sign the user certificate using its private key, and the user’s browser must be able to validate the signature.
For some CAs, the certificate requests are generated using a command line interface. The details of the exact command and the requirements of each CA will vary and can be found on the CA’s site.
Once received the request, the CA will have to confirm your authenticity through your certificate. This usually involves a physical meeting or a phone call with a Registration Authority (RA). A RA is delegated by the CA to verify the legitimacy of a request, and approve it if it is valid. The RA is usually someone at your home institute, and will generally need some kind of ID to prove your identity.
Install a Certificate
After approval, the certificate is generated and delivered to you. This can be done via email, or by giving instructions to you to download it from a web page.
Browser installation
Install the certificate in your browser. If you don’t know how to upload your certificate in your browser have a look at the examples.
Host installation
To use EGI services with your certificate, you must first save your certificate to disk.
The received certificate will usually be in one of two formats:
- Privacy Enhanced Mail Security Certificate (PEM) with extension
.pemor - Personal Information Exchange File (PKCS12) with extensions
.p12or.pfx.
The latter is the most common for certificates exported from a browser (e.g.
Internet Explorer, Mozilla and Firefox), but the PEM format is currently
needed on EGI user interface. The certificates can be converted from one format
to the other using the openssl command.
If the certificate is in PKCS12 format, then it can be converted to PEM
using pkcs12:
First you will need to create the private key, use
-nocerts. Open your terminal, enter the following command:openssl pkcs12 -nocerts -in my_cert.p12 -out userkey.pemwhere:
Filename Description my_cert.p12is the input PKCS12 format file; userkey.pemis the output private key file; usercert.pemis the output PEM certificate file. When prompted to
“Enter Import Password”, simply press enter since no password should have been given when exporting from keychain. When prompted to“Enter PEM pass phrase”, enter the pass phrase of your choice, e.g.1234.Now you can create the certificate, use
-clcerts, (use-nokeyshere will not output private key), and the command is:openssl pkcs12 -clcerts -nokeys -in my_cert.p12 -out usercert.pemWhen prompted to
“Enter Import Password”, simply press enter since no password should have been given when exporting from keychain.For further information on the options of the pkcs12 command, consult
man pkcs12
It is strongly recommended that the names of all these files are kept as shown.
Once in PEM format, the two files, userkey.pem and usercert.pem, should be
copied to a User Interface (UI). For example, the ‘standard’ location for Mac
would be .globus directory in your $HOME. I.e. $HOME/.globus/
Renewing the Certificate
CAs issue certificates with a limited duration (usually one year); this implies the need to renew them periodically. The renewal procedure usually requires that the certificate holder sends a request for renewal signed with the old certificate and/or that the request is confirmed by a phone call; the details depend on the policy of the CA. The certificate usually needs to be renewed before the old certificate expires; CAs may send an email to remind users that renewal is necessary, but users should try to be aware of the renewal date, and take appropriate action if they are away for extended periods of time.
Taking Care of Private Keys
A private key is the essence of your identity. Anyone who steals it can impersonate the owner and if it is lost, it is no longer possible to do anything. Certificates are issued personally to individuals, and must never be shared with other users. To user EGI services, users must agree to an Acceptable Use Policy, which among other things requires them to keep their private key secure.
On a UNIX UI, the certificate and private key are stored in two files. Typically
they are in a directory called $HOME/.globus and are named usercert.pem and
userkey.pem, and it is strongly recommended that they are not changed. The
certificate is public and world-readable, but the key must only be readable by
the owner. The key should be stored on a disk local to the user’s UI rather
than, for example, an NFS-mounted disk. If a certificate has been exported from
a browser, a PKCS12-format file (.p12 or .pfx), which contains the private
key, will have been locally stored and this file must be either encrypted,
hidden or have its access rights restricted to only the owner.
If a private key is stored under the Andrew File System (AFS), access is controlled by the AFS Access Control Lists (ACL) rather than the normal file permissions, so users must ensure that the key is not in a publicly-readable area.
Web browsers also store private keys internally, and these also need to be protected. The details vary depending on the browser, but password protection should be used if available; this may not be the default (it is not with Internet Explorer). The most secure mode is one in which every use of the private key needs the password to be entered, but this can cause problems as some sites ask for the certificate many times. Reaching a compromise between security and convenience is vital here, so that neither come too short.
It is important not to lose the private key, as this implies loss of all access to the services, and registration will have to be started again from scratch. Having several securely protected copies in different places is strongly advised, so the certificate can be used from a web browser and several UI machines.
A private key stored on a UI must be encrypted, meaning that a passphrase must be typed whenever it is used. A key must never be stored without a passphrase. The passphrase should follow similar rules to any computer password. Users should be aware of the usual risks, like people watching them type or transmitting the passphrase over an insecure link.
Authorisation
The sites authorise the access to their resources to a VO according to their own access policies, resource location, how many resources is the VO allowed to use. There are finer authorization policies, including groups, roles, in this way, the users can be structured in a VO. So, it is not a 0/1 authorization policy.
The community has full control of the access to the VO according to community authorization policies. The VO membership, groups and roles are managed by VO managers (Privileged VO members) independently by using the Virtual Organization Membership Service (VOMS).
VOMS
The Virtual Organization Membership Service (VOMS) is an attribute authority which serves as central repository for VO user authorization information, providing support for sorting users into group hierarchies, keeping track of their roles and other attributes in order to issue trusted attribute certificates and SAML assertions used in the Grid environment for authorization purposes. VOMS is composed of two main components:
- the VOMS core service, which issues attribute certificates to authenticated clients
- the VOMS Admin service, which is used by VO manager to administer VOs and manage user membership details.
How does it work? Usually, users submit tasks/jobs to the infrastructure that are attached with their own credential, and the credential is attached with a proxy certificate that is a short-term credential signed with the user certificate and is extended with the VO attributes. In general speaking, a user credential is just an ID, and a proxy contains the VO details, so a resource site by receiving the proxy can recognize that the user is part of such a VO with such a role from such a group. A user can be part of multiple VO, thus can generate multiple proxies.
Register to a VO
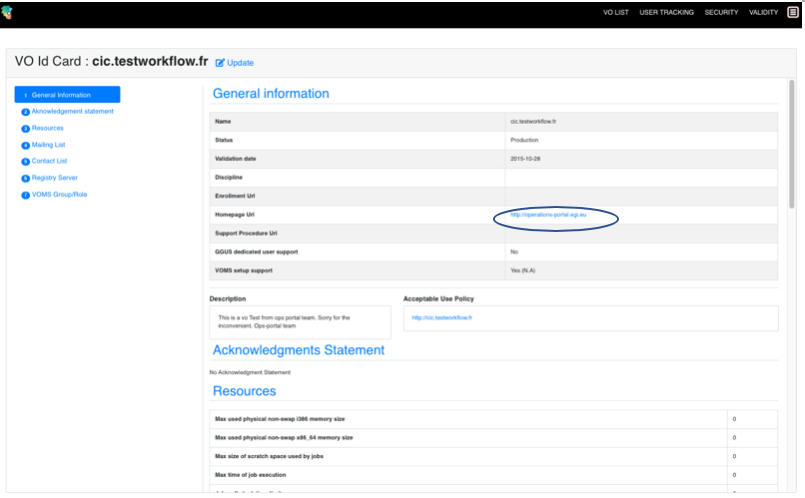
Visit Operation Portal to search for existing VOs
If there are any community VOs matching your requirements (with Registry System is VOMS), then click Action-> Details to look at the VO information. In the VO ID Card page, click the link for Enrollment URL, it will take you to the VO VOMS page. You should have already discussed with the EGI support team, they would help you to contact the VO managers and get approval for your access.
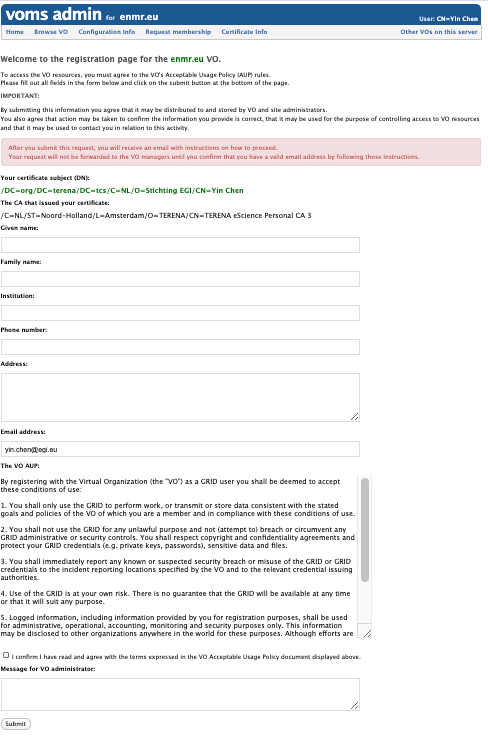
If there are no relevant VOs, you can send a request to register a new VO. (Note, for EGI services, you should request for
VOMS configuration, once VO is configured, you will be notified about your VO VOMS link). More information can be found at Guideline for VO registration. Again, this is usually guided by the EGI support team. You should already have a meeting with them to discuss your requirements. They will help you to get resources from EGI providers, and sign SLA with you.Request your VO membership at VO VOMS page. You will have to enter required information and then wait for approval.
Creating a proxy
VOMS configuration
Every VO needs two different pieces of information:
- the
vomsesconfiguration files, where the details of the VO are stored (e.g. name, server, ports). These are stored by default at/etc/vomsesand are normally named following this convention:<vo name>.<server name>(e.g. for fedcloud.egi.eu VO, you would havefedcloud.egi.eu.voms1.grid.cesnet.czandfedcloud.egi.eu.voms2.grid.cesnet.cz. - the
.lscfiles that describe the trust chain of the VOMS server. These are stored at/etc/grid-security/vomsdir/<vo name>and there should be one file for each of the VOMS server of the VO.
You can check specific configuration for your VO at the
Operations portal. Normally each VOMS
server has a Configuration Info link where the exact information to include in
the vomses and .lsc files is shown.
Proxy creation
Once you have the VO information configured (vomses and .lsc) and your
certificate available in your $HOME/.globus directory you can create a VOMS
proxy to be used with clients with:
voms-proxy-init --voms <name of the vo> --rfc
See for example, using fedcloud.egi.eu VO:
voms-proxy-init --voms fedcloud.egi.eu --rfc
Enter GRID pass phrase:
Your identity: /DC=org/DC=terena/DC=tcs/C=NL/O=EGI/OU=UCST/CN=Enol Fernandez
Creating temporary proxy ......................................................... Done
Contacting  voms1.grid.cesnet.cz:15002 [/DC=cz/DC=cesnet-ca/O=CESNET/CN=voms1.grid.cesnet.cz] "fedcloud.egi.eu" Done
Creating proxy ................................................................... Done

Your proxy is valid until Mon Feb  4 23:37:21 2019