OpenStack in EGI Cloud
OpenStack providers of the EGI Cloud Compute service offer native OpenStack features via native APIs integrated with EGI Check-in accounts.
The extensive OpenStack user documentation includes details on every OpenStack project most providers offer access to:
- Keystone, for identity
- Nova, for VM management
- Glance, for VM image management
- Cinder, for block storage
- Swift, for object storage
- Neutron, for network management
- Horizon, as a web dashboard
Access through web dashboard
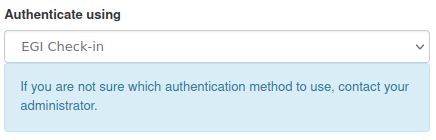
The Horizon Web-dashboard of the OpenStack providers can be accessed using your EGI Check-in credentials directly.
Select EGI Check-In:
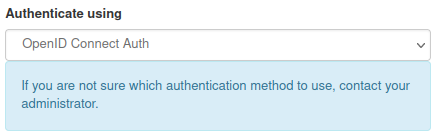
Or OpenID Connect:
Or egi.eu:
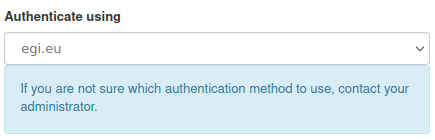
In the Authenticate using drop-down menu of the login screen.
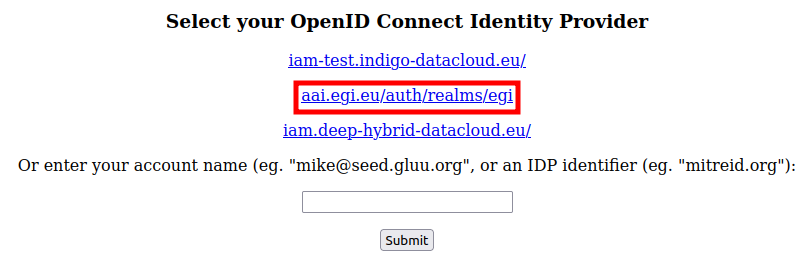
Additionally you may need to select aai.egi.eu/auth/realms/egi as well:
Tip
You can also find links to all the providers dashboards at the EGI Cloud Compute dashboard.
You can quickly find the dashboards of all providers in the EGI infrastructure that are accessible to you (use the correct VO) with the FedCloud Client:
$ fedcloud endpoint list --service-type org.openstack.horizon --site ALL_SITES
The same way you can also discover other types of resources, just use the correct resource type:
org.openstack.horizonfor dashboardsorg.openstack.novafor virtual machinesorg.openstack.swiftfor object storage
The FedCloud client
The FedCloud client is a high-level Python package for a command-line client designed for interaction with the OpenStack providers in the EGI infrastructure.
Tip
The FedCloud client is the recommended command-line interface to use with OpenStack in EGI, as it provides an easy to use wrapper around the default OpenStack client.FedCloud client has the following modules (features):
- Check-in allows checking validity of access tokens and listing Virtual Organisations (VOs) of a token
- Endpoint can search endpoints in the Configuration Database and extract site-specific information from unscoped/scoped tokens
- Sites allows management of site configurations
- OpenStack can perform commands on OpenStack services deployed to sites
- EC3 allows deploying elastic cloud compute clusters
Installation
The FedCloud client can be installed with the pip3 Python package manager
(without root or administrator privileges).
To install the FedCloud client:
$ pip3 install fedcloudclient
This installs the latest version of the FedCloud client, together with its
required packages (like openstackclient). It will also create executables
fedcloud and openstack, adding them to the bin folder corresponding to
your current Python execution environment ($VIRTUAL_ENV/bin for executing pip3
in a Python virtual environment, ~/.local/bin for executing pip3 as user (with
--user option), and /usr/local/bin when executing pip3 as root).
As there are non-pure Python packages needed for installation, the Microsoft C++ Build Tools is a prerequisite, make sure it’s installed with the following options selected:
- C++ CMake tools for Windows
- C++ ATL for latest v142 build tools (x86 & x64)
- Testing tools core features - Build Tools
- Windows 10 SDK (
<latest>)
In case you prefer to use non-Microsoft alternatives for building non-pure packages, please see Python Windows Compilers.
To install the FedCloud client:
> pip3 install fedcloudclient
This installs the latest version of the FedCloud client, together with its
required packages (like openstackclient). It will also create executables
fedcloud and openstack, adding them to the bin folder corresponding to
your current Python execution environment.
Check if the installation is correct by executing the client:
$ fedcloud --version
Installing EGI Core Trust Anchor certificates
Some sites in the EGI infrastructure use certificates issued by Certificate Authorities (CAs) that are not included in the default OS distribution. If you receive error message “SSL exception connecting to…”, install the EGI Core Trust Anchor Certificates by running the following commands:
$ wget https://raw.githubusercontent.com/tdviet/python-requests-bundle-certs/main/scripts/install_certs.sh
$ bash install_certs.sh
Note
The above script does not work on all Linux distributions. Change python to python3 in the script if needed, see the README for more details, or follow the official instructions for installing EGI Core Trust Anchor certificates in production environments.Using via Docker container
The FedCloud client can also be used without installation, by running it in a Docker container. In this case, the EGI Core Trust Anchor certificates are pre-installed.
To run the FedCloud client in a container, make sure Docker is installed, then run the following commands:
$ docker pull tdviet/fedcloudclient
$ docker run -it tdviet/fedcloudclient bash
To run the FedCloud client in a container, make sure Docker is installed, then run the following commands:
$ docker pull tdviet/fedcloudclient
$ docker run -it tdviet/fedcloudclient bash
To run the FedCloud client in a container, make sure Docker is installed, then run the following commands:
> docker pull tdviet/fedcloudclient
> docker run -it tdviet/fedcloudclient bash
Once you have a shell running in the container with the FedCloud client, usage is the same as from the command-line.
Using from EGI Notebooks
EGI Notebooks are integrated with access tokens so it simplifies using the FedCloud client. First make sure that you follow the installation steps above. Then, below are the commands that you need to run inside a terminal in JupyterLab:
export OIDC_ACCESS_TOKEN=`cat /var/run/secrets/egi.eu/access_token`
fedcloud token check
Please follow instructions below to learn how to
use the fedcloud command.
Using from the command-line
The FedCloud client has these subcommands:
- fedcloud token for checking access tokens (see token subcommands)
- fedcloud endpoint for querying the Configuration Database (see endpoint subcommands)
- fedcloud site for manipulating site configurations (see site subcommands)
- fedcloud openstack or fedcloud openstack-int for performing OpenStack commands on sites (see openstack subcommands)
- fedcloud ec3 for provisioning elastic cloud compute clusters (see cluster subcommands)
Performing any OpenStack command on any site requires only three options: the site, the VO and the command. For example, to list virtual machine (VM) images available to members of VO fedcloud.egi.eu on the site CYFRONET-CLOUD, run the following command:
$ fedcloud openstack image list --vo fedcloud.egi.eu --site CYFRONET-CLOUD
Authentication
Many of the FedCloud client commands need access tokens for authentication.
Users can choose whether to provide access tokens directly (via option
--oidc-access-token), or generate them on the fly with oidc-agent (via
option --oidc-agent-account) or from refresh tokens (via option
--oidc-refresh-token, which must be provided together with option
--oidc-client-id and option --oidc-client-secret).
Tip
Users of EGI Check-in can get a Check-in client ID and refresh token, as well as all the information needed to obtain access tokens for their FedCloud client, by visiting EGI Check-in Token Portal.Tip
To provide access tokens automatically via oidc-agent, follow these instructions to register a client, then pass the client name (account name used during client registration) to the FedCloud client via option--oidc-agent-account.Important
Refresh tokens have long lifetime (one year in EGI Check-in), so they must be properly protected. Exposing refresh tokens via environment variables or command-line options is considered insecure and will be disabled in the near future in favour of using oidc-agent.If multiple methods of getting access tokens are given at the same time, the FedCloud client will try to get an access token from the oidc-agent first, then obtain one using the refresh token.
The default authentication protocol is openid. Users can change the default
protocol via the option --openstack-auth-protocol. However, sites may have the
protocol fixed in the site configuration (e.g. oidc for the site
INFN-CLOUD-BARI).
The default OIDC identity provider is EGI Check-in
(https://aai.egi.eu/auth/realms/egi). Users can set another OIDC identity
provider via option --oidc-url.
Note
Remember to also set the identity provider’s name accordingly for OpenStack commands, by using the option--openstack-auth-provider.Environment variables
Most of the FedCloud client options can be set via environment variables:
Tip
To save a lot of time, set the frequently used options like access token, VO, etc. using environment variables.Tip
When you want commands to work on all sites in the EGI infrastructure, useALL_SITES for the --site parameter.| Environment variable | Command-line option | Default value |
|---|---|---|
| OIDC_AGENT_ACCOUNT | --oidc-agent-account | |
| OIDC_ACCESS_TOKEN | --oidc-access-token | |
| OIDC_REFRESH_TOKEN | --oidc-refresh-token | |
| OIDC_CLIENT_ID | --oidc-client-id | |
| OIDC_CLIENT_SECRET | --oidc-client-secret | |
| OIDC_URL | --oidc-url | https://aai.egi.eu/auth/realms/egi |
| OPENSTACK_AUTH_PROTOCOL | --openstack-auth-protocol | openid |
| OPENSTACK_AUTH_PROVIDER | --openstack-auth-provider | egi.eu |
| OPENSTACK_AUTH_TYPE | --openstack-auth-type | v3oidcaccesstoken |
| EGI_VO | --vo |
Getting help
The FedCloud client can display help for the commands and subcommands it supports. Try running the following command to see the commands supported by the FedCloud client:
$ fedcloud --help
Usage: fedcloud [OPTIONS] COMMAND [ARGS]...

Options:
  --version  Show the version and exit.
  --help     Show this message and exit.

Commands:
  ec3            EC3 related commands
  endpoint       endpoint command group for interaction with GOCDB and...
  openstack      Executing OpenStack commands on site and VO
  openstack-int  Interactive OpenStack client on site and VO
  site           Site command group for manipulation with site...
  token          Token command group for manipulation with tokens
Similarly, you can see help for e.g. the openstack subcommand by running the
command below:
$ fedcloud openstack --help
Usage: fedcloud openstack [OPTIONS] OPENSTACK_COMMAND...

  Executing OpenStack commands on site and VO

Options:
  --oidc-client-id TEXT           OIDC client id
  --oidc-client-secret TEXT       OIDC client secret
  --oidc-refresh-token TEXT       OIDC refresh token
  --oidc-access-token TEXT        OIDC access token
  --oidc-url TEXT                 OIDC URL  [default: <https://aai.egi.eu/auth/realms/egi>]
  --oidc-agent-account TEXT       short account name in oidc-agent
  --openstack-auth-protocol TEXT  Check-in protocol  [default: openid]
  --openstack-auth-type TEXT      Check-in authentication type  [default:
                                  v3oidcaccesstoken]
  --openstack-auth-provider TEXT  Check-in identity provider  [default:
                                  egi.eu]
  --vo TEXT                       Name of the VO  [required]
  -i, --ignore-missing-vo         Ignore sites that do not support the VO
  -j, --json-output               Print output as a big JSON object
  --help                          Show this message and exit.
Note
Most commands support multiple levels of subcommands, you can get help for all of them using the same principle as above.Using from Python
The FedCloud client can be used as a library for developing other services and tools for EGI services. Most of the functionalities can be called directly from Python code without side effects.
An usage example is available on
GitHub.
Just copy/download the code, add your access token and execute python demo.py
to see how it works.
Using in scripts
The FedCloud client can also be used in scripts for simple automation, either for setting environment variables for other tools, or to process outputs from OpenStack commands.
Setting environment variables for external tools
Some FedCloud commands generate output that contains shell commands to set environment variables with the returned result, as exemplified below.
Run a command to get details of a project:
$ export EGI_SITE=IISAS-FedCloud
$ export EGI_VO=eosc-synergy.eu
$ fedcloud site show-project-id --site $EGI_SITE
export OS_AUTH_URL="https://cloud.ui.savba.sk:5000/v3/";
export OS_PROJECT_ID="51f736d36ce34b9ebdf196cfcabd24ee";
Run the same command but set environment variables with the returned values:
$ eval $(fedcloud site show-project-id)
The environment variables will have their values set to what the command returned:
$ echo $OS_AUTH_URL
https://cloud.ui.savba.sk:5000/v3/

$ echo $OS_PROJECT_ID
51f736d36ce34b9ebdf196cfcabd24ee
Run a command to get details of a project:
> set EGI_SITE=IISAS-FedCloud
> set EGI_VO=eosc-synergy.eu
> fedcloud site show-project-id --site %EGI_SITE%
set OS_AUTH_URL=https://cloud.ui.savba.sk:5000/v3/
set OS_PROJECT_ID=51f736d36ce34b9ebdf196cfcabd24ee
If you copy the returned output and execute it as commands in a command prompt:
> set OS_AUTH_URL=https://cloud.ui.savba.sk:5000/v3/
> set OS_PROJECT_ID=51f736d36ce34b9ebdf196cfcabd24ee
The environment variables will have their values set to what the command returned:
> set OS_AUTH_URL
OS_AUTH_URL=https://cloud.ui.savba.sk:5000/v3/

> set OS_PROJECT_ID
OS_PROJECT_ID=51f736d36ce34b9ebdf196cfcabd24ee
Run a command to get details of a project:
> $Env:EGI_SITE="IISAS-FedCloud"
> $Env:EGI_VO="eosc-synergy.eu"
> fedcloud site show-project-id --site $Env:EGI_SITE
$Env:OS_AUTH_URL="https://cloud.ui.savba.sk:5000/v3/";
$Env:OS_PROJECT_ID="51f736d36ce34b9ebdf196cfcabd24ee";
Run the same command but set environment variables with the returned values:
> fedcloud site show-project-id --site $Env:EGI_SITE `
                | Out-String | Invoke-Expression
The environment variables will have their values set to what the command returned:
> $Env:OS_AUTH_URL
https://cloud.ui.savba.sk:5000/v3/

> $Env:OS_PROJECT_ID
51f736d36ce34b9ebdf196cfcabd24ee
Processing output from OpenStack commands
The fedcloud openstack subcommand’s output can be converted to
JavaScript Object Notation (JSON) format
by using the --json-output option. This is useful for further machine
processing of the command output.
Tip
JSON output can be processed with a tool like jq, which can slice, filter, map, and transform structured data. It acts as a filter: it takes an input and produces an output. Check out the tutorial for using it to extract data from JSON sources.$ export EGI_SITE=IISAS-FedCloud
$ export EGI_VO=eosc-synergy.eu
$ fedcloud openstack flavor list --site $EGI_SITE --json-output
[
{
"Site": "IISAS-FedCloud",
"VO": "eosc-synergy.eu",
"command": "flavor list",
"Exception": null,
"Error code": 0,
"Result": [
{
"ID": "0",
"Name": "m1.nano",
"RAM": 64,
"Disk": 1,
"Ephemeral": 0,
"VCPUs": 1,
"Is Public": true
},
{
"ID": "2e562a51-8861-40d5-8fc9-2638bab4662c",
"Name": "m1.xlarge",
"RAM": 16384,
"Disk": 40,
"Ephemeral": 0,
"VCPUs": 8,
"Is Public": true
},
...
]
}
]
# The following jq command selects flavors with VCPUs=2 and prints their names
$ fedcloud openstack flavor list --site IISAS-FedCloud --json-output | \
jq -r '.[].Result[] | select(.VCPUs == 2) | .Name'
m1.medium
Note
Note that--json-output option can be
used only with those OpenStack commands that have outputs. Using this parameter
with commands with no output (e.g. setting properties) will generate an
unsupported parameter error.Obtaining tokens for other clients
Most OpenStack clients allow authentication with tokens, so you can easily use them with EGI Cloud providers just doing a first step for obtaining the token:
fedcloud openstack --site <NAME_OF_THE_SITE> --vo <NAME_OF_VO> token issue -c id -f value
Useful OpenStack commands
Usage of the OpenStack client is described in detail at OpenStack documentation.
Please refer to the nova documentation for a complete guide on the VM management features of OpenStack. We list in the sections below some useful commands for the EGI Cloud.
Registering an existing ssh key
It’s possible to register an ssh key that can later be used as the default ssh
key for the default user of the VM (via the --key-name argument to
openstack server create):
fedcloud openstack keypair create --public-key ~/.ssh/id_rsa.pub mykey
Creating a VM
fedcloud openstack flavor list
FLAVOR=<FLAVOR_NAME>
fedcloud openstack image list
IMAGE_ID=<IMAGE_ID>
fedcloud openstack network list
# Pick FedCloud network
NETWORK_ID=<NETWORK_ID>
fedcloud openstack security group list
fedcloud openstack server create --flavor $FLAVOR --image $IMAGE_ID \
  --nic net-id=$NETWORK_ID --security-group default \
  --key-name mykey oneprovider
# Creating a floating IP
fedcloud openstack floating ip create <NETWORK_NAME>
# Assigning floating IP to server
fedcloud openstack server add floating ip <SERVER_ID> <IP>
# Removing floating IP from server
fedcloud openstack server show <SERVER_ID>
# Deleting server
fedcloud openstack server remove floating ip <SERVER_ID> <IP>
fedcloud openstack server delete <SERVER_ID>
# Deleting floating IP
fedcloud openstack floating ip delete <IP>
Using cloud-init
fedcloud openstack server create --flavor m3.medium \
  --image d0a89aa8-9644-408d-a023-4dcc1148ca01 \
  --user-data userdata.txt --key-name My_Key server01.example.com
Shell script data as user data
#!/bin/sh
adduser --disabled-password --gecos "" clouduser
cloud-config data as user data
#cloud-config
hostname: mynode
fqdn: mynode.example.com
manage_etc_hosts: true
Creating a snapshot image from running VM
You can create a new image from a snapshot of an existing VM that will allow you to easily recover a previous version of your VM or to use it as a template to clone a given VM.
fedcloud openstack server image create <your VM> --name <name of the snapshot>
Once the snapshot is ready openstack image show <name of the snapshot> will
give your the details you can use it as any other image at the provider:
fedcloud openstack server create --flavor <flavor> \
  --image <name of the snapshot> \
  <name of the new VM>
You can override files in the snapshot if needed, e.g. changing the SSH keys:
fedcloud openstack server create --flavor <flavor> \
  --image <name of the snapshot> \
  --file /home/ubuntu/.ssh/authorized_keys=my_new_keys \
  <name of the new VM>
libcloud
Apache libcloud supports OpenStack and
EGI authentication mechanisms by setting the ex_force_auth_version to
3.x_oidc_access_token. Check the
libcloud docs on connecting to OpenStack
for details. See below sample code:
import requests

from libcloud.compute.types import Provider
from libcloud.compute.providers import get_driver

refresh_data = {
    'client_id': '<your client_id>',
    'client_secret': '<your client_secret>',
    'grant_type': 'refresh_token',
    'refresh_token': '<your refresh_token>',
    'scope': 'openid email profile',
}

r = requests.post("https://aai.egi.eu/auth/realms/egi/protocol/openid-connect/token",
                  auth=(client_id, client_secret),
                  data=refresh_data)

access_token = r.json()['access_token']

OpenStack = get_driver(Provider.OPENSTACK)
# first parameter is the identity provider: "egi.eu"
# Second parameter is the access_token
# The protocol 'openid' is specified in ex_tenant_name
# and tenant/project cannot be selected :(
driver = OpenStack('egi.eu', access_token, ex_tenant_name='openid',
                   ex_force_auth_url='https://keystone_url:5000',
                   ex_force_auth_version='3.x_oidc_access_token')