Submitting HTC Jobs
Overview
This tutorial describes how to submit High Throughput Compute (HTC) jobs using command-line.
This tutorial is meant for somewhat advanced users or the ones willing or needing to interact with the resources at a low level.
Prerequisites
To submit an EGI HTC job, you will have to:
- Obtain an X.509 user certificate. The supported certificates are issued by Certification Authorities (CAs) part of the European Policy Management Authority for Grid Authentication (EUGridPMA), which is also part of the International Global Trust Federation (IGTF).
- Enrol into a VO having access to HTC resources.
This tutorial will be using
dteama test Virtual Organisation that can be used by resource providers, commands should be adjusted to the appropriate VO.
Step 1: getting access to a User Interface (UI)
In order to interact with HTC resources, you should have access to a
User Interface, often referred to as a UI. This software environment will
provide all the tools required to interact with the different middleware, as
different sites can be using different Computing Element (CE), such as
HTCondorCE and ARC-CE (CREAM is a legacy software stack that is not officially
supported).
Different possibilities are available to access an UI:
- Having access to an UI provided by/for your community, please get in touch with them about this.
- Deploying a UI, as documented below.
Deploying an UI
The UI is available as a package in the UMD software distribution, but it will also require additional software and configuration.
In order to help with deploying an UI, different solutions are possible:
- Deploying an UI manually, using the packages available from
UMD repositories. You will need to install at least
the
uimeta-package, the IGTF distribution, and configure the system to use voms-client. - Some Ansible roles are available in the EGI Federation GitHub organisation, mainly ansible-role-ui that should be used together with ansible-role-VOMS-client, providing software and material required for the authentication and authorisation, and ansible-role-umd configuring the software repositories from where all the software will be installed.
- The repository
ui-deployment provides a
terraform based deployment allowing to deploy a
User Interface (UI)in a Cloud Compute virtual machine. This integrated deployment is based on the Ansible modules, and should be adjusted to your environment and needs.
This tutorial is based on using a VM deployed using the ui-deployment repository, refer to the repository for detailed instructions on deploying the UI.
Step 2: creating a VOMS proxy
The Virtual Organization Membership Service (VOMS) enables Virtual Organisation (VO) access control in distributed services. A proxy allows limited delegation of rights, allowing remote services to securely interact with other resources and services on behalf of the user.
Configuring the system to use voms-client
When using ansible-role-VOMS-client, the full environment has been setup for you, and there is no need for manual configuration.
Before being able to use voms-client, it is required to
configure access to the VOMS server of the chosen VO,
using the proper .vomses and .lsc files, based on the information available
on the VOMS server of the specific VO.
- as an example with
dteam, you can find the VOMS server address in the Operations Portal: https://operations-portal.egi.eu/vo/view/voname/dteam. Then looking at dteam VOMS configuration, you can create:/etc/vomses/dteam-voms2.hellasgrid.grwith the content of the VOMSES string./etc/grid-security/vomsdir/dteam/voms2.hellasgrid.gr.lscwith the content for the LSC configuration.
If you cannot edit content in /etc/vomses and /etc/grid-security/vomsdir,
you can respectively use ~/.glite/vomses and ~/.glite/vomsdir. You may have
to export X509_VOMSES and X509_VOMS_DIR in your shell, as documented
on CERN’s twiki:
$ export X509_VOMSES=~/.glite/vomses
$ export X509_VOMS_DIR=~/.glite/vomsdir
Preparing the X.509 credentials
Once you have obtained an X.509 user certificate issued by a Certification
Authority (CA) part of the
International Global Trust Federation (IGTF), you should
extract the certificate and private key, and add them to a ~/.globus
directory.
If the X.509 certificate is in your browser’s keyring, you should export it to a
passphrase protected .p12 file, then using
openssl pkcs12 you
can extract the required PEM files:
# Creating and protecting ~/.globus directory
$ mkdir -p ~/.globus
$ chmod 750 ~/.globus
# Extracting the certificate from the p12 file "exported_cert.p12"
openssl pkcs12 -in exported_cert.p12 -out ~/.globus/usercert.pem -clcerts -nokeys
# Adjusting rights on the user certificate
$ chmod 640 ~/.globus/usercert.pem
# Extracting the certificate key from the p12, protecting it with a passphrase
$ openssl pkcs12 -in exported_cert.p12 -out ~/.globus/userkey.pem -nocerts
# Adjusting rights on the certificate key
$ chmod 400 ~/.globus/userkey.pem
If you are using a certificate provided by the GÉANT Trusted Certificate Service (TCS), in addition to the official documentation provided by your organisation, you may be interested by looking at the following documentation:
- Generation 4 GEANT Trusted Certificate Service TCS, covering how to get and install your credentials, addressing potential issues with an improper .p12. Highly recommended.
- SUNET TCS 2020- Information for administrators, an exhaustive documentation mainly for administrators but also covering client-related aspects.
Using voms-client
Once the
configuration for the VOMS client
has been completed, and when the
X.509 credentials have been prepared, you can
create a VOMS proxy for dteam VO:
# Creating the proxy
$ voms-proxy-init -voms dteam
Enter GRID pass phrase for this identity:
Contacting voms2.hellasgrid.gr:15004 [/C=GR/O=HellasGrid/OU=hellasgrid.gr/CN=voms2.hellasgrid.gr] "dteam"...
Remote VOMS server contacted successfully.


Created proxy in /tmp/x509up_u1001.

Your proxy is valid until Wed Oct 26 23:27:30 CEST 2022
# Checking the proxy
$ voms-proxy-info
subject   : /DC=org/DC=terena/DC=tcs/C=NL/O=Stichting EGI/CN=Jane Doe/CN=123456319
issuer    : /DC=org/DC=terena/DC=tcs/C=NL/O=Stichting EGI/CN=Jane Doe
identity  : /DC=org/DC=terena/DC=tcs/C=NL/O=Stichting EGI/CN=Jane Doe
type      : RFC3820 compliant impersonation proxy
strength  : 2048
path      : /tmp/x509up_u1001
timeleft  : 11:58:48
key usage : Digital Signature, Key Encipherment
References
Step 3: identifying available resources
It is possible to identify available resources by querying the information system.
Two Computing Element (CE) “flavours” are used in production:
- HTCondorCE, a Compute Entrypoint (CE) based on HTCondor.
- ARC-CE, the ARC Compute Element (CE).
In this section we will document querying the EGI Information System to retrieve information about the available resources.
Tip
It’s also possible to use VAPOR to query resources using a graphical interface.Use case: identifying all the Computing Elements supporting the dteam VO
As documented in the pages covering the
querying of the Information System,
in GLUE 2.0, the access granted to a given VO to a compute or storage
resource, is published using the GLUE2Share and GLUE2Policy objects. The
GLUE2ComputingShare object specifically documents sharing of compute
resources.
# Querying GLUE2ComputingShare for all the computing resources available to dteam VO
$ ldapsearch -x -LLL -H ldap://lcg-bdii.egi.eu:2170 \
    -b "GLUE2GroupID=grid,o=glue" \
    '(&(objectClass=GLUE2ComputingShare)(GLUE2ShareID=*dteam*))'
It is possible to filter for the different types of Computing Element, and select only specific attributes.
Once you will have selected a site, using the ldapsearch queries from the next
subsections, you will be able to send jobs to them, as documented in the
Step4: submitting and managing jobs.
Information
The following Computing Elements have been arbitrarily chosen, like due to the site location, available resources, prior experience, or any other reason, and will be used in this tutorial:
- HTCondorCE:
condorce1.ciemat.es - ARC-CE:
alex4.nipne.ro
Looking for a HTCondorCE for dteam
# Information about the HTCondorCE supporting dteam VO
$ ldapsearch -x -LLL -H ldap://lcg-bdii.egi.eu:2170 \
    -b "GLUE2GroupID=grid,o=glue" \
    '(&(objectClass=GLUE2ComputingShare)(GLUE2ShareID=*dteam*)(GLUE2ComputingShareComputingEndpointForeignKey=*HTCondorCE*))' \
    GLUE2ShareEndpointForeignKey \
    GLUE2ShareID \
    GLUE2ComputingShareTotalJobs \
    GLUE2ComputingShareRunningJobs \
    GLUE2ComputingShareWaitingJobs

# XXX Most HTCondorCE have the Endpoint ending in `HTCondorCE`, but some have
# it ending with `htcondorce`, like in this tutorial for `condorce1.ciemat.es`
# XXX The attribute `GLUE2ComputingShareComputingEndpointForeignKey` is matched
$ in a case sensitive way, and the filter should be updated to match them
$ ldapsearch -x -LLL -H ldap://lcg-bdii.egi.eu:2170 \
    -b "GLUE2GroupID=grid,o=glue" \
    '(&(objectClass=GLUE2ComputingShare)(GLUE2ShareID=*dteam*)(|(GLUE2ComputingShareComputingEndpointForeignKey=*HTCondorCE*)(GLUE2ComputingShareComputingEndpointForeignKey=*htcondorce*)))' \
    GLUE2ShareEndpointForeignKey \
    GLUE2ShareID \
    GLUE2ComputingShareTotalJobs \
    GLUE2ComputingShareRunningJobs \
    GLUE2ComputingShareWaitingJobs
As it was decided to go for condorce1.ciemat.es, the information about the CE
can be requested using the following request, filtering on the GLUE2ShareID
from the previous query: grid_dteam_condorce1.ciemat.es_ComputingElement.
# condor_submit needs CE (condorce1.ciemat.es) and pool (condorce1.ciemat.es:9619)
$ ldapsearch -x -LLL -H ldap://lcg-bdii.egi.eu:2170 \
    -b "GLUE2GroupID=grid,o=glue" \
    '(&(objectClass=GLUE2ComputingShare)(GLUE2ShareID=*grid_dteam_condorce1.ciemat.es_ComputingElement*))' \
    GLUE2ShareID \
    GLUE2ShareDescription \
    GLUE2ComputingShareExecutionEnvironmentForeignKey \
    GLUE2EntityOtherInfo
HTCondorCE are usually running on port 9619, this is confirmed by the results.
Based on those results, it’s possible to guess the following parameters that
will have to be used when submitting the job:
- CE Name:
condorce1.ciemat.es(reported inGLUE2ComputingShareExecutionEnvironmentForeignKey: condorce1.ciemat.es) - CE Pool:
condorce1.ciemat.es:9619(reported inGLUE2EntityOtherInfo: HTCondorCEId=condorce1.ciemat.es:9619/htcondorce-condor-group_dteam)
Looking for an ARC-CE for dteam
// jscpd:ignore-start
# Information about the ARC-CE supporting dteam VO
$ ldapsearch -x -LLL -H ldap://lcg-bdii.egi.eu:2170 \
    -b "GLUE2GroupID=grid,o=glue" \
    '(&(objectClass=GLUE2ComputingShare)(GLUE2ShareID=*dteam*)(GLUE2ComputingShareComputingEndpointForeignKey=*urn:ogf*))' \
    GLUE2ComputingShareComputingEndpointForeignKey \
    GLUE2ShareEndpointForeignKey \
    GLUE2ComputingShareTotalJobs \
    GLUE2ComputingShareRunningJobs \
    GLUE2ComputingShareWaitingJobs
As it was decided to go for alex4.nipne.ro, the information about the CE can
be requested using the following request, filtering on the GLUE2ShareID from
the previous query: urn:ogf:ComputingShare:alex4.nipne.ro:dteam_dteam.
# arcsub needs CE name (alex4.nipne.ro)
$ ldapsearch -x -LLL -H ldap://lcg-bdii.egi.eu:2170 \
    -b "GLUE2GroupID=grid,o=glue" \
    '(&(objectClass=GLUE2ComputingShare)(GLUE2ShareID=*urn:ogf:ComputingShare:alex4.nipne.ro:dteam_dteam*))' \
    GLUE2ShareID \
    GLUE2ShareDescription \
    GLUE2ComputingShareComputingServiceForeignKey \
    GLUE2ComputingShareExecutionEnvironmentForeignKey
// jscpd:ignore-end
- CE Name:
alex4.nipne.ro(exported from theGLUE2ComputingShareComputingServiceForeignKey: urn:ogf:ComputingService:alex4.nipne.ro:arex)
Step 4: submitting and managing jobs
To an HTCondorCE Computing Element
The HTCondor-CE software is a Compute Entrypoint (CE) based on HTCondor for sites that are part of a larger computing grid (e.g. EGI, Open Science Grid (OSG)).
The condor package will install all the required dependencies.
yum install condor
Condor will use the VOMS proxy created earlier.
While HTCondor provides an official HTCodnor Quick Start Guide, the main steps for managing a job will be highlighted below.
Create env.sub, the compute job to be executed on the remote Computing
Element:
executable              = /usr/bin/env
log                     = env.log
output                  = outfile.txt
error                   = errors.txt
should_transfer_files   = Yes
when_to_transfer_output = ON_EXIT
queue
The format of the submit description file, is documented in
HTCondor manual
and
condor_submit man page.
Submission of a job with the -spool option causes HTCondor to spool all input files, the job event log, and any proxy across a connection to the machine where the condor_schedd daemon is running. After spooling these files, the machine from which the job is submitted may disconnect from the network or modify its local copies of the spooled files.
Submit job using condor_submit:
# Submitting a job, spooling input and output files to
$ condor_submit --spool --name condorce1.ciemat.es \
    --pool condorce1.ciemat.es:9619 env.sub
Submitting job(s).
1 job(s) submitted to cluster 97412.
Monitor the status of the job using condor_q:
# Checking the status of a specific job
$ condor_q --name condorce1.ciemat.es --pool condorce1.ciemat.es:9619 97412


-- Schedd: condorce1.ciemat.es : <192.101.161.188:9619?... @ 10/26/22 16:31:00
OWNER    BATCH_NAME    SUBMITTED   DONE   RUN    IDLE  TOTAL JOB_IDS
dteam050 ID: 97412   10/26 16:21      _      _      _      1 97412.0

Total for query: 1 jobs; 1 completed, 0 removed, 0 idle, 0 running, 0 held, 0 suspended
Total for all users: 884 jobs; 412 completed, 0 removed, 200 idle, 259 running, 13 held, 0 suspended


# Checking the status of all jobs running on that
$ condor_q --name condorce1.ciemat.es --pool condorce1.ciemat.es:9619


-- Schedd: condorce1.ciemat.es : <192.101.161.188:9619?... @ 10/26/22 16:25:03
OWNER    BATCH_NAME    SUBMITTED   DONE   RUN    IDLE  TOTAL JOB_IDS
dteam050 ID: 97400   10/26 15:46      _      _      _      1 97400.0
dteam050 ID: 97412   10/26 16:21      _      _      _      1 97412.0

Total for query: 2 jobs; 2 completed, 0 removed, 0 idle, 0 running, 0 held, 0 suspended
Total for dteam050: 2 jobs; 2 completed, 0 removed, 0 idle, 0 running, 0 held, 0 suspended
Total for all users: 883 jobs; 411 completed, 0 removed, 200 idle, 259 running, 13 held, 0 suspended
It is also possible to view the output of a running job using condor_tail.
Download the job output to the UI using condor_transfer_data:
# Retrieving the output of a specific job
 $ condor_transfer_data -name condorce1.ciemat.es -pool condorce1.ciemat.es:9619 97412.0
Fetching data files...
References
To an ARC-CE Computing Element
ARC Compute Element (CE) is a Grid front-end on top of a conventional computing resource (e.g. a Linux cluster or a standalone workstation). ARC CE is sometimes also called ARC server.
While there is an official documentation on How to submit a job, the main steps will be documented below.
If you haven’t already generated a credential with voms-proxy-init, you can
generate a proxy certificate using ARC’s own tool: arcproxy, which is using
the same credentials as voms-proxy-init, and should produce an equivalent
proxy. To do this you first need to
prepare your X.509 credentials.
# Generating a proxy for ARC
$ arcproxy --voms dteam
Enter pass phrase for private key:
Your identity: /DC=org/DC=terena/DC=tcs/C=NL/O=Stichting EGI/CN=Jane Doe
Contacting VOMS server (named dteam): voms2.hellasgrid.gr on port: 15004
Proxy generation succeeded
Your proxy is valid until: 2022-10-27 02:23:52
Create testjob.xrsl, a test job expressed in
xRSL, showing environment
where it will run:
&( executable = "/usr/bin/env" )
( jobname = "arctest" )
( stdout = "stdout" )
( join = "yes" )
( gmlog = "gmlog" )
Then review the ARC CE information and send the job using
arcsub:
# Getting info about the selected CE
# Example CE: alex4.nipne.ro:2811/nordugrid-SLURM-dteam
$ ldapsearch -x -LLL -H ldap://lcg-bdii.egi.eu:2170
    -b "Mds-Vo-Name=local,o=grid" \
    '(&(objectClass=GlueCE)(GlueCEUniqueID=alex4.nipne.ro:2811/nordugrid-SLURM-dteam))'
# Submitting the job, the JOB_ID will be written on the output
$ arcsub --jobdescrfile testjob.xrsl --computing-element alex4.nipne.ro
Job submitted with jobid: gsiftp://alex4.nipne.ro:2811/jobs/....
# Export JOB_ID to be used for other commands
$ JOB_ID="gsiftp://alex4.nipne.ro:2811/jobs/...."
Then you can use
arcstat
to monitor the job:
# Monitoring the status of the job
$ arcstat "$JOB_ID"

# Use -l parameter with arcstat to get more information on the status of the Job
$ arcstat -l "$JOB_ID"
The jobs will be in state Finished once completed.
You can finally retrieve the output of a finished job using
arcget:
# Retrieve output files of the finished job, removing them from the server
$ arcget "$JOB_ID"

Results stored at: Ow7KmRKv71nuvw3Vp3UrRNqABFKDmABFKDmfJKDmABFKDmoeT5zn
Jobs processed: 1, successfully retrieved: 1, successfully cleaned: 1
Instead of manually selecting a site, it’s possible to do some automatic
selection from CE registered in a central registry, such as nordugrid.org.
# Automatic selection on the CE in the nordugrid.org registry
$ arcsub --jobdescrfile testjob.xrsl --registry nordugrid.org
(...)
gsiftp://vm3.tier2.hep.manchester.ac.uk:2811/jobs/...
JOB_ID="gsiftp://vm3.tier2.hep.manchester.ac.uk:2811/jobs/.."

# Use -l parameter to get more information on the status of the Job
$ arcstat -l "$JOB_ID"
References
To a CREAM Computing Element
The CREAM (Computing Resource Execution And Management) Service is a simple, lightweight service that implements all the operations at the Computing Element (CE) level.
The first step is to prepare a JDL as testjob.jdl. The
CREAM JDL Guide,
documents the creation of the JDL:
[
Type = "Job";
JobType = "Normal";
Executable = "/usr/bin/env";
StdOutput = "output.txt";
StdError = "error.txt";
OutputSandbox = {"output.txt", "error.txt"};
]
Then you can submit, monitor and retrieve the output of the job.
Those commands are broken on the UI installed from UMD via our Ansible module, but are provided here as a reference, and for users having access to UI maintained by or for their community and providing the required commands.
# Submitting a job, job ID would be printed to the output
$ glite-ce-job-submit 'lpsc-cream-ce.in2p3.fr:8443/cream-pbs-dteam' testjob.jdl
# Use a variable with the job ID to be reused later
JOB_ID='...'
# Monitoring the job
$ glite-ce-job-status "$JOB_ID"
# Retrieving the output of the job
$ glite-ce-job-output "$JOB_ID"
References
Via the EGI Workload Manager
The EGI Workload Manager is a service provided to the EGI community to efficiently manage and distribute computing workloads on the EGI infrastructure.
Using the Workload Manger web interface or the DIRAC command-line interface (CLI) is documented in the EGI Workload Manager.
Troubleshooting
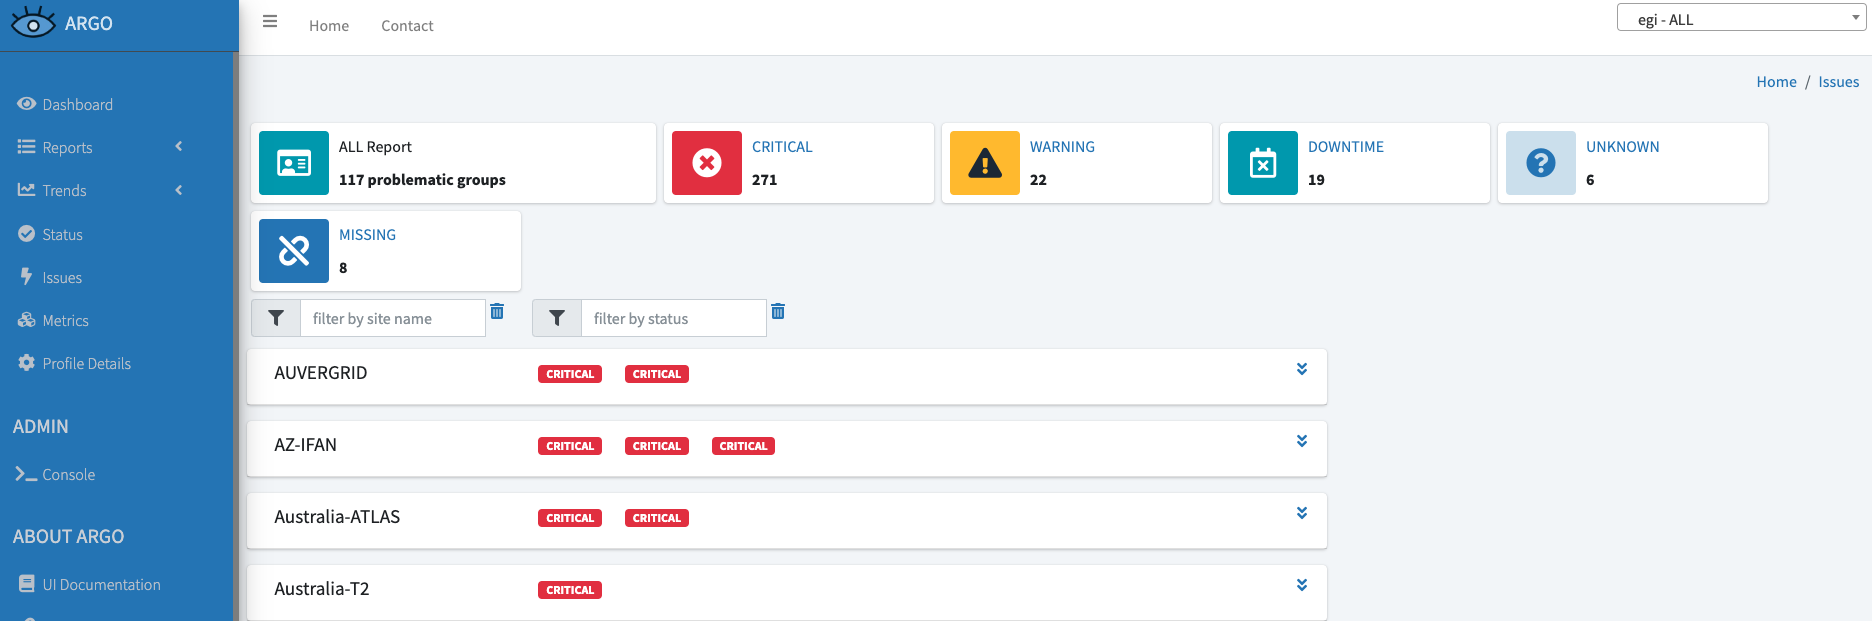
In case you receive errors when submitting jobs to Computing Elements, it may be possible that the service is in Downtime for an intervention/upgrade or there is an issue already reported by the EGI Monitoring System ARGO.
To check the information about downtimes or issues you can browse the ARGO Issues Page and, as shown in the figure below, check if there are active Downtimes for the service you are trying to use (By clicking on the Downtime button) or issues (By clicking on the CRITICAL button).
Asking for help
If you find issues please do not hesitate to contact us.